Wednesday, January 4, 2012

Mixed Bunch Black & White CCMC182

Today's card uses a new set and punch from the fabulous new Occasions Mini Catalog:  Mixed Bunch and the coordinating Blossom Punch.  No hand cutting on this baby!  I love that... the easier, the better!!

The sketch is from Create with Connie and Mary CCMC182; isn't it a great one?! 

I used several of my favorite products on this card!  First, the background vine stamp from the Creative Elements set which I just recently purchased but have wanted it since I first saw it in the catalog.  Secondly the Elegant Lines Embossing Folder (actually I love them all!!) that seems to repeat the swirling lines in the white background above.  Thirdly the Mocha Morning Specialty Paper (some sheets in the package have flocking and some have a metallic sheen!); the two-tone black at the bottom of the design is a sumptuous flocked design!  Fourth, the Tasteful Trim Die that makes fabulous edgings; I used it for the large scallops down the left side.

Now I've added this Mixed Bunch stamp set and the Blossom Punch (that so perfectly cuts out the three large flowers in the set in one move) to my growing list of favorites!  And you will too, once you see and use them!!
The famcy flower or medallion was stamped on Whisper White with VersaMark then heat embossed with SU's Black Embossing Powder.  The resulting raised embossing with a shine really draws attention to this focal point of the design.

The color scheme is black and white with a dramatic touch of Lucky Limeade.  I added a Rhinestone to the center of the flower that I colored with a green and a yellow Sharpie marker!  I love how you can customize Stampin' Up!s Basic Rhinestones and Pearls with the alcohol markers to enhance your design!!

What is your favorite new product from the new Occasions Mini Catalog?  I know, I know, it's impossible to choose from all the fab new items, but leave me a comment and mention one or two!!

Thanks for visiting today!  Hope to see you again soon! 

Margaret

Friday, December 30, 2011

Let It Snow!

Here's an easy card that is cheerful and fun using the adorable snowman set "Let It Snow".  I love the Baja Breeze, Blushing Bride and Whisper White color scheme!  It's so clean and fresh looking.
The Whisper White layer was  embossed with the Northern Frost Embossing Folder then layered onto Blushing Bride then a card base of Baja Breeze.  The embossing was very lightly sponged with Baja Breeze just to accentuate the snowflakes.  The Designer Paper is Candy Cane Christmas from the 2010 Holiday Mini; love that paper.

This card can be used for several occasions: Christmas, thank you, winter birthday or thinking of you; I sent it as a birthday card.  A greeting could be added in the lower right; the Teeny Tiny Wishes set would work perfectly!

The new Occasions 2012 Mini will go into effect on January 5th!  It has some fabulous new products in it; can't wait for you to see them! 

I hope you had a good Christmas with family and friends!  Here's wishing you a Happy New Year!

Margaret

Friday, December 9, 2011

Merry & Bright, CCMC179 and SQSC16

For this Christmas card I combined the Create with Connie and Mary Color Challenge (CCMC179)  this week and the Stampin Queen's Sketch Challenge (SQSC 16) over at the Stampin' Queens blog.
Connie and Mary's Challenge of Poppy Parade, Lucky Limeade and Basic Grey was a challenge... that's not a normal color scheme I would have come up with for a Christmas card, lol, but I ended up happy with the result.  I added in some Whisper White which helps give contrast to the dark-ish grey and the bright poppy and limeade. 
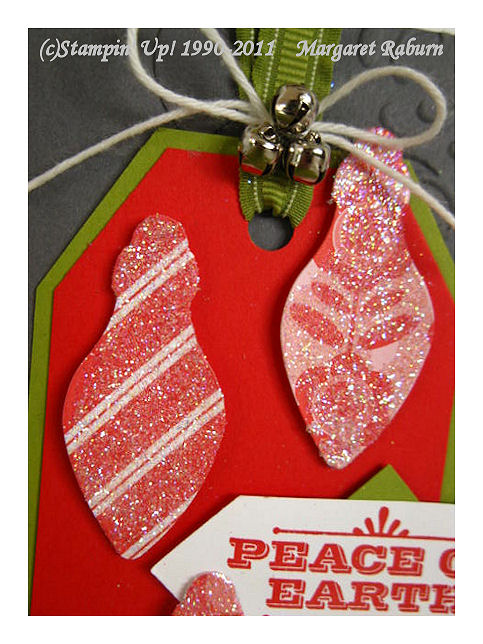
 The right side of the Basic Grey panel was textured with the Big Shot and the Finial Press Embossing Folder.  Barely visible in the pictures is a strip of Basic Grey cut with the Tasteful Trim Die which covers the seam between the plain and the embossed sections of the background.  The tag is Poppy Parade layered on Lucky Limeade.  At the top of the tag, a length of Lucky Limeade Ruffled Ribbon is tied with White Twine then three Mini Jingle Bells added with Mini Glue Dots.
I used the Stocking Accents Originals Die from the Holiday Mini to diecut the ornament shapes from Poppy Parade Designer Papers that were a Hostess Premium last year.  (Love that FREE stuff!)  I spread glue all over each one with my Two-Way Glue Pen then dipped them in the Dazzling Diamonds glitter!  They REALLY sparkle and shine!!  They were adhered with Dimensionals to give them height and prominence.  
The sentiment is from the Merry & Bright set.  It is stamped with Poppy Parade, cut down then a 7/8" square of Lucky Limeade was adhered behind the center.  This was attached to the card with Dimensionals.

I hope you enjoyed the card and will visit the two challenge sites and see what others did with this sketch and color combination!  Thanks for visiting me today!

Merry Christmas and happy stamping!

Margaret


Wednesday, December 7, 2011

Christmas "JOY" Wall Hanging

Hello!  Sorry to have been so long in posting!  I've been out of town and returned home coming down with "something" so haven't been stamping!  Hope the meds kick in soon because there's a lot to be done before Christmas!

I did manage to finish my JOY wall hanging that I had almost finished before I left town.  I enjoyed the FALL wall hanging (here) so much that I wanted to do one for the Christmas holiday season also, so here it is.
Of course, my photography and lighting don't do it justice; the snowflakes are die cut from the Silver Glimmer Paper Cardstock (just stunningly sparkley!!) with the Big Shot and the #120901 Northern Frost Decorative Strip Die.  The ribbon is the 1-1/4" Riding Hood Red Striped Ribbon which was available previously on the Online Clearance Rack (I just checked and it's not there any longer... those are some great sale prices and some things sell out quickly!)  

I used the Scallop Square Clear Die to cut Riding Hood Red cardstock for each letter.  The background Designer Series Paper is Letters to Santa, which has a color scheme of Riding Hood Red, Early Espresso, Old Olive and Marina Mist; this is the Ornament Print.  This is a fun DSP, having mostly bold images on one side and lovely small plaids on the other!  Love it!  The letter "J" is die cut with the Serif Essentials Die set (#113464) from both Riding Hood Red and Early Espresso and layered to give depth; this is attached to a Scallop Circle of Old Olive embossed with the Houndstooth Embossing Folder and the Big Shot.
For the "O", I made a rosette (also called a lolly) using my SU Simply Scored tool and the Riding Hood Red pattern from the package and centered it with a super-sparkley snowflake of Silver Glitter Cardstock.  This was adhered to a scallop circle of Marina Mist (cut with the Scallop Circle Die) that is edged with Champagne Mist Glass Glitter (beautiful stuff, it is!)  The large print background is in Early Espresso and again one of the DSP patterns.
The "Y" is much like the "J" square but I used the Snow Burst Embossing Folder (#124096) from the Holiday Mini Catalog to texturize the Scallop Circle base.  The "stamps" pattern paper from the DSP is used as the background on the Scallop Scquare  Each letter has one of the sparkly Silver Glimmer Paper snowflakes on it and each square has a small Early Espresso Quilted Satin Ribbon bow at the bottom.

Thank you for visiting me today!  I hope you enjoyed the project.  I always love to hear from you, so if you willl take the time to say hello and leave a comment, it means a lot!

Have a great day!

Margaret

Sunday, November 20, 2011

Designer Frames Oval Embossing Folder

Have you seen the Designer Frames set of Textured Impressions Embossing Folders in the main Idea Book and Catalog?  New this year, there are two different shapes in the package, oval and rectangle, which make such great focal points for your projects!

My card today features the Oval Frame Embossing Folder and the Extra Wide Oval Punch which is perfectly designed to fit right inside the embossed oval frame!  How cool is that!  The Blushing Bride cardstock piece was run through the Big Shot in the Oval Frame Embossing Folder; the greeting was stamped in Early Espresso on Whisper White cardstock then punched out with the Extra Wide Oval Punch then adhered inside the frame for a custom look!  I love the look we get with this folder!
The card base is Blushing Bride layered with Early Espresso.  Old Olive underlays the oval frame layer, whose corners are treated with the Ticket Corner Punch for extra punch.
The lower portion of the card features a rectangle of Letters to Santa Designer Paper.  Although this Designer Paper features some large patterns, the reverse sides mostly feature small plaids and some wonderful stripes which are appropriate for a wide variety of projects!  I love this combo of Blushing Bride, Old Olive and a touch of Early Espresso brown!  The corners are treated with the Ticket Corner Punch and a swath of Blushing Bride 1/2" Stitched Poly Ribbon completes the look. 
 Designer Frames Embossing Folders
Bring on the Cake stamp set

Letters to Santa Designer Series Paper
Thanks for visiting today!  Have a great day!

Margaret

Wednesday, November 16, 2011

Snow Much Fun!

Hello!  Today I have a card that was one of our Make and Takes (each attendees get to make two) from Lora's party Monday night!  With Christmas quickly heading our way, we can't have too many Christmas cards ready to give, can we?! 
This fun card uses the shorter snowman in the Snow Much Fun stamp set (main catalog, pg. 35) as well as one of the two sentiments in the set.  The base card is Marina Mist cardstock; the Whisper White layer was run through the Big Shot in the Northern Flurry Embossing Folder to give it the beautiful texture of snowflakes.  Doesn't that embossing add so much to a simple card!?
 
Here is a close-up of the outside sentiment which was stamped in Real Red on Whisper White cardstock, then punched with the Modern Label Punch.  Another Modern Label Punch of Marina Mist cardstock was cut in two horizontally and added to the backside of the white for a layered look.  Tiny Rhinestones add to the bling.  It is attached with Dimensionals for height. Speaking of, we used the wonderful Dazzling Details liquid glitter to add sparkle on various places on the embossed snowflakes and focal image of the card.

The shorter snowman was stamped on Whisper White cardstock, colored with Stampin' Write Markers and Blender Pens, then punched out with the 1-3/4" Circle Punch.  Real Red card stock die cut with the Perfect Pennant BigzL Die and the Big Shot makes a lovely pierced scallop layer for the snowman image.  There are two different pierced circles on that die, and they both are scalloped and pierced-- so pretty!

Guests at my workshops/parties always get to do two Make and Takes!  And the hostess earns lots of free dollars to spend in the catalog any way she wishes!!   Wouldn't you like to host a party and earn free Stampin' Up! products yourself?  Just contact me!
SNOW MUCH FUN    Idea Book & Catalog pg. 35
Thanks for visiting today!  I'll post the other Make and Take soon!

Margaret

Related Posts Plugin for WordPress, Blogger...