Wednesday, February 24, 2010

Spring Sweet Treat!

Last week we had our "Stamp Therapy" meeting, five good friends who are Stampin' Up! demos!  We have such a great time sharing, problem solving, planning and stamping!  That is one of the greatest benefits of stamping and being a demo:  the friendships that you develop and enjoy!

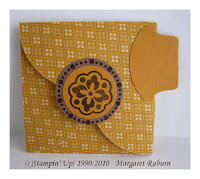
Today's card was our Make 'n Take for the meeting, brought by Jann McCollom.  Isn't this just the cutest thing?!!  We all loved it!  It's another great way to use those wonderful little heart-shaped treat cups!

The bottom front of the card opens and you can stamp your greeting inside.  It is held closed by a Mini Library Clip with a ribbon adhered to it with a Mini Glue Dot.

There is a "trap door" on the upper back of the card to allow the candy to be removed without damaging the card.  The bird on the top is adhered to a tab on  top of the slider that holds the candy in.  You can see a picture of the back candy access below.

Isn't this creative!!  We all oooh-ed and ahhh-d over it and were thrilled to get to make one!  I'm sorry I don't have a template for cutting this card; I would share it if I did.

Stamps:  Sweetheart #120780 (clear mount)
Ink:  Only Orange, Green Galore, Tempting Turquoise
Paper:  Summer Sun, Whisper White
Accessories:  Mini Library Clips, 1" Circle Hole Punch, Round Tab Punch, Full Heart Punch, Paper Snips

All the Bold Bright colors make me so ready for spring!  We are all certainly ready for spring here in Oklahoma!  However the weatherman tells us to expect a good snowfall on Friday once again!  He did reassure us by saying this can't go on forever, lol!!  I hope that you are warm and safe wherever you are!

Hope you get some time to be creative and stamp today; it's good Therapy!!

Margaret

Saturday, February 20, 2010

Abundant Hope Easter Card

Even though it is still cold, I welcome the days when the temperature is a little warmer and the sun is shining.  I'm looking for signs of spring, and one of those signs would be the shoots of green from bulbs like crocus and daffodils.  Like Easter, these welcome green shoots are symbols of new life to come!


I trimmed off the first two design rows of my Finial Press Embossing Folder and used that with the Big Shot to dry emboss the open edge of the Certainly Celery card. 

The daffodils were stamped with Basic Black onto Whisper White cardstock.  Color was added with Stampin' Write Markers in Certainly Celery and Apricot Appeal, So Saffron, Blender Pens and the So Saffron ink pad.  The horizontal flourish was stamped in Orchid Opulence

Underneath the image is a layer of Orchid Opulence cardstock which has the Easter greeting subtly stamped with Orchid Opulence.  A tie of Apricot Appeal Grosgrain Ribbon encircles this before it is adhered to the celery card front.

Stamps:  Abundant Hope, #117054 wood, $17.95; #118547 clear mount, $13.95.
Ink:  Orchid Opulence, So Saffron.
Markers:  So Saffron, Apricot Appeal, Certainly Celery
Paper:  Certainly Celery, Orchid Opulence Whisper White card stock
Accessories:  Blender Pen, Apricot Appeal 1/4" grosgrain ribbon, Big Shot, Finial Press Embossing Folder, Scallop Edge Punch

Thanks for visiting today!  I hope spring soon breaks through winter for all of us who've been in winter mode!  Have a great weekend!

Margaret

Friday, February 19, 2010

Die Cut Flowers Card, Bloggers Challenge 139

Today is Friday so it's Blogger's Challenge day!  Today's challenge is the sketch seen on the right.  I decided to go with flowers instead of the circle for my card.

This challenge is perfect for using these Pre-Die Cut Flowers (no Big Shot required for these!)  They are perfect when you want really nice and fast flowers!  There are four die cut 12" x 12" sheets of Textured Cardstock in a package, one each of Old Olive, Pumpkin Pie, Bashful Blue and Real Red, with dozens of flowers on each, and many different sizes and shapes.  The Textured Cardstock has an almost linen-like appearance and is so classy.
The card base is Bashful Blue.  The next layer, Certainly Celery, was dry embossed with the Big Shot and the Eyelet Texturz Plate for some soft and simple  background texture.  Three pieces of the Striped Grosgrain Ribbon in the same colors as the flowers were adhered to the celery before that layer was added to the card base.  The three die cut flowers were assembled, a celery punched out flower was added to the center then a Jumbo White Brad holds it all together.  The petals were shaped with my fingers then the flower was attached to the card with Dimensionals.

I just really felt the need for a greeting so the greeting from Teeny Tiny Wishes was stamped in Old Olive on white then punched with the Small Oval Punch and layered onto an Old Olive Modern Label punch-out.  This was also adhered with Dimensionals.  Viola!  Done!  Using the Die Cut Flowers made this card   quick and easy!

Die Cut Flowers (#111376, pg. 169, $8.95)

Stamps:  Teeny Tiny Wishes
Ink:  Old Olive
Paper:  Bashful Blue, Certainly Celery, Old Olive, Whisper White
Accessories:  Punches:  Modern Label, Small Oval, BoHo Blossoms.  Dimensionals, Die Cut Flowers (#111376, pg. 169, $8.95), Big Shot, Eyelet Texturz Plate, Jumbo Brad

You can see the other talented Blogger's Challenger stamper's projects by clicking here  then clicking on their name.

Have you used these die cut flowers before?  They are great for "quick and easy" projects!  Thanks for visiting me today!  I appreciate you taking the time to drop by! 

Have a great weekend!
Margaret

Wednesday, February 17, 2010

Meet the Extra Large Fancy Flower Punch!

Have you met the new Extra Large Fancy Flower Punch from Stampin' Up?  It was introduced in the 2010 Occasions Mini Catalog in January and is a BIG sister to the flower punches we already have!  At over 2" in diameter, it puts the other flower punches in the shade!  Gotta love it!  Like flowers in the spring, paper flowers are popping up in papercrafting projects everywhere you look and this punch is a fabulous tool for creating some fun and gorgeous flowers of your own!


The large flower on this card was made like the one on the box I posted here.  I twice stamped the large image from the With All My Heart stamp set on Pretty in Pink cardstock with Rose Red ink.  These were punched out with the Extra Large Fancy Flower punch, snipped with Paper Snips then curled with a Bone Folder and fingers.  I layered the two together with a Dimensional.  Next the small flower from the set was stamped and punched out with the Trio Flower Punch, a Gold Brad added to the center and attached to the base flowers with another Dimensional.

The flowers were attached to layers of Whisper White, So Saffron and Certainly Celery, which reflect the colors in the Sweet Pea Designer Series Paper.  The front side edge of the card was punched with the Pinking Hearts Border punch; a 1/2" strip of the Sweet Pea Designer Paper peeks out from underneath the back edge of the card back.  "Happy Birthday" is from the Well Scripted set in the Occasions Mini.

Stamps:  With All My Heart, Well Scripted stamp sets
Ink:  Rose Red Classic
Paper:  Pretty in Pink, Whisper White, So Saffron, Certainly Celery; Sweet Pea Designer Series Paper
Accessories:  Pinking Hearts Border, Extra Large Fancy Flower Punch, Trio Flower Punch, Gold Brad

I do so appreciate your visit to my blog.  Thanks so much for taking the time to leave me a message; it is so encouraging to read your comments and questions!

Happy Stampin'!

Margaret

Monday, February 15, 2010

Petal Card Die Box II

Here is another box made with the Petal Card Die for the Big Shot diecutting machine.  These boxes are so fun and easy to make... you really need this die!  I'm really having fun exploring the ways to use it!

The box was constructed from four petal card  diecuts of Orchid Opulence cardstock.  {see instructions here}  Each of the four sides was covered with either Certainly Celery or So Saffron cardstock then a layer of the delicate polka dot pattern from the Shades of Spring Designer Series Paper.


I made paper flowers from coordinating colors of So Saffron, Pretty in Pink and another piece of the dotted DSP used for the background.  The new Extra Large Fancy Flower punch was used for the So Saffron flower.  Before punching, I stamped the cardstock with the new Fine Flourish stamp from the Occasions Mini in So Saffron ink.  I snipped the petals further in toward the center and curled each petal with my bone folder.  The BoHo Blossoms Punch was used to punch the second flower out of the same polka dot DSP; I did the same clipping of petals and bending the paper petals with my fingers.  The pink center was punched with the same BoHo Blossoms punch, curled and then all three flowers put together with a So Saffron Brad from the Rich Regals Brads assortment.  The flower was then attached to both the front and back of the box with Mini Glue Dots (gotta love those things!)


Certainly Celery cardstock, prestamped with the Fine Flourish stamp in celery, were punched out with the Five Petal Flower Punch, cut into individual petals, creased down the center and used for the leaves.  They were adhered with Mini Glue Dots.

Luxurious Pretty in Pink Satin Ribbon was used for the bow and tie around the box for the finishing touch. (pic. 4, side view)

You can see all my other Petal Card Die creations by clicking on "Petal Card die" in the Labels at the bottom of this post.

Thanks for dropping by.  I hope you like this spring box with the Petal Card Die!  Thanks for leaving me a comment too!

Margaret

Sunday, February 14, 2010

Sweetheart Treat Card

Happy Valentine's Day to you!  Hope it was a good day for each and everyone!

I just got in from a four day trip to Phoenix AZ last night and have one more little Valentine to share with you before this day passes; it's made with the Heart Treat Cups and the Sweetheart stamp set.  This one is so simple; it doesn't have a folded card back and can be handed out as the Valentine and treat in one.  There is a tag that opens in the back so the candy can be extracted without tearing up the card also!

Real Red cardstock is the base, then the heart was stamped onto Whisper White cardstock and punched out with the Full Heart Punch.  The Heart Treat Cup had some adhesive applied to the back side of the white, just enough to secure the heart cup, which was then inserted from the back side of the white layer.  This was then laid aside.

A 3" square of Real Red cardstock just 1/4" larger than the white was punched with the 1" Circle Punch and a greeting stamped on it.  This was adhered to the white layer using Snail adhesive across the bottom only and one Dimensional at each of the top corners.  This gives some room to easily insert a tag between the layers.

A tag was cut from Pink Passion cardstock and a Round Tab Punch in the same color was adhered to the top.  A "flag" of Red Striped Grosgrain was stapled to the top edge after  "just for you" from the Teeny Tiny Wishes set was stamped on the tab.  This tab was slipped between the layers after the cup was filled with Valentine M&Ms.

This was a quick and easy project, and can be adapted for many occasions such as table or shower favors, for example.  It's really fun to color coordinate them with the candy to be used in them!

Thanks for visiting!  Please come back soon; I plan to have more Petal Card Die projects ready to post soon!

Margaret

Friday, February 12, 2010

Valentine Sweetheart Treat Card

Today being Friday, it's Blogger's Challenge day, and today's challenge is VALENTINE!  Not that we haven't all been churning out all sorts of sweet notes and every type of candy holder imaginable, but since THE day is just two days away, it's almost our last chance to  wish everyone a Happy Valentine's Day for 2010 and give you some candy (for your eyes, lol)!!

I used the wonderful Sweetheart stamp set which coordinates with the Heart Treat Cups to make my Valentine today!  (Both items are in the Occasions Mini Catalog.)  These are so much fun to make and to give, and see the reaction!  (like, how do I get that candy out!, lol!)  Love those Valentine M&Ms, so I keyed my color scheme to go with them:  red, pinks, white, yum!  It's finished off with a sash of the beautiful White Organza Ribbon!

You can see what the other Blogger's Challengers did by clicking here to see the list; just click on a name and it will take you to where their project is posted.

Thanks for visiting today!  Have a great weekend!

Margaret

Tuesday, February 9, 2010

"Sending Love" with a Petal Card Die Box

Today is another chapter in using the Petal Card Die!  You can actually make a 2.5" "cube" box with it!  Cool, hmm??

Cut four Petal Card diecuts with the Big Shot and the Petal Card Die in cardstock of your choice.  Trim one "petal" scallop off each diecut at the score line (A).  Lay the diecuts face down on your work surface then overlap the scallop on the side opposite of where the scallop was removed onto the straight edge of the die cut (see picture B).  Adhere them with Mono Adhesive, Glue Stick or Sticky Strip.  This will give you a line of four petal cards glued together.  (C)

 Turn this over and decorate the sides of your box while it is flat; it's much easier now than later!  : )  Then crease all the score llines and assemble your box by adhering the last scallop and straight edge.  You're almost finished!

Crease the score lines to make the bottom of your box then fold these scallops in like you close a four flap box (half of each flap will be showing, see pic on left below).  You may add a little adhesive to the flaps now if you wish but it will hold some weight even without glue. Now set the box right side up and crease the top flaps and fold in the same manner.  Add a beautiful ribbon such as the Pink Satin Ribbon from the Occasions Mini Catalog, and Viola!  You're finished!  

Now tuck some delicious treat or small but special gift inside, tie on a bow and you're ready for the occasion!  Anyone would be delighted to receive such an enchanting little box with a treasure inside!

Great for shower, party or wedding favors also!

My red box features Real Red and Pretty in Pink Cardstock, Sending Love Designer Series Paper (already glittered!) and luscious Pink Satin Ribbon.  All products by Stampin' Up!

 Thanks for coming by today!  Wishing you a good day!  Leave me a shout out by clicking on "comments" in the tiny letters at the end of today's post and let me know if this post was helpful!?  THANK YOU!

Margaret

p.s.  Save the scallops you cut off when you make your box; we will be using them for another project with this die!  ...  to be continued...   : )   

Sunday, February 7, 2010

Petal Card Die: Page Corner Bookmarks

Here's another quick and useful project to add to my adventures with the Petal Card Die... a corner bookmark!  I love these bookmarks that sit on the corner of the page, and this one even has the addition of a tab for easy on and off!

I used Melon Mambo Designer Series Paper for my bookmark, cutting a 4 7/8" square to run through my Big Shot with the Petal Card die.  I used a Cutting Plate and a shim (a piece of cardstock) underneath my die, the die, the paper on top of the die then my Crease Pad on top of the paper.  This gave me a very nice cut and score lines.  Each machine is calibrated a little bit differently, so try yours out to see what combination you need to get the perfect cut and score.

Fold up the bottom scallop toward the inside of the bookmark and adhere; then fold in the scallop to your left and adhere also.  The top and right scallops should be folded in and adhered only to each other where they overlap.  Punch a tab out with the Round Tab Punch (I used cardstock for my tab but you could also use the opposite side of the DSP for a pretty effect) and adhere it to the right side with the tab extending from the right of the bookmark.

For the finishing touch, you can cut and punch out a fairly small image or you could use an appropriate sentiment like "Thinking of You"  and layer it on punch-out before adhering it to your bookmark.  On the Melon Mambo bookmark, I have used the "Friend" heart from the I {Heart} Hearts stamp set and punched it out with the Full Heart Punch!  Easy-peasy!  It's not even layered!

I've also included a couple of others that I made for samples  I have another one that i seemed to have not photographed yet but will add it later.

This 6 x 6 Level I Hostess Gift Paper Packs are just perfect for making these, so if you have one, you are all set to roll.  If not, why not have a home workshop with your friends and earn one free, along with other free merchandise!

The second bookmark (Lavender) is embellished with the bunny from the Eggcoutrements set; the third (More Mustard) bookmark uses the Circle Circus set and would be a nice choice for a guy.

This die is so much more versatile that I ever realized.  There are so many ways to use this and I'm tickled to have it!  I will be using it even more now!  You can order it from your Stampin' Up! Demonstrator, or from me or my SU website here.  Click on "Shop Now".

#113467  Petal Card Die   p. 199, 2009-2010 Idea Book and Catalog

Thanks for visiting today!  I really appreciate you taking time to leave me a message or comment telling me you've dropped by to see me and my blog.  :)

Thanks!

Margaret

Saturday, February 6, 2010

Petal Card Die Hanging Heart Box


Here's another of my projects I've been making using the Petal Card Die:  a Hanging Heart Box.  I love how it really takes on so much dimension by being treating to a pass through the Big Shot in an Embossing Folder, this time the Stampin' Up! Finial Press folder.  This box can be used for so many things, or simply as a home decoration when decorated with a theme.

Cut out two of the diecuts, then decorate the front diecut as desired.  Fold back two of the scallops, forming a heart.  Do this on both diecuts.  Cut a piece of cardstock 5" long and the desired width for your box; I cut mine 5" x 1.5".  Crease it in the center at 2.5", then put Sticky Strip heavy-duty double sided adhesive down both edges of this strip. The crease will go at the point of the heart and the scallop is adhered to the cardstock strip, forming the "box".

Apply a Jumbo Grommet with the Crop-A-Dile and tie a hanger of the luxurious Satin Ribbon through the grommets, knotting the ends. (Love that gorgeous ribbon!!)  You're done and it is really quite easy!

These can be decorated for any occasion or season and would be a lovely container for a gift or candy!


Thanks for visiting today!  I would love for you to acknowledge your visit and say "Hi!" by leaving a comment!  Thanks!

Have a great weekend!


Margaret

Friday, February 5, 2010

Petal Card Die Box

I've been exploring some of the uses for the Petal Card Die for my Big Shot machine.  Who knew that this die could be used for so much more that the expected basic Petal Card?  I've made a hanging heart candy holder, a square candy holder, corner bookmarks and a hanging heart box so far; today I have a darling little box that is useful for so many occasions!

I cut a 5.5" square of Basic Black cardstock and scored it with the scoring blade on my  12" Paper Trimmer 1.5" from each edge to make the base of the box.  For the lid, I stamped a piece of Whisper White cardstock with the desired image; I used the I {Heart} Hearts set and stamped the filagree heart in Basic Black and the dotted line heart in Real Red.  This was die cut with the Big Shot and the Petal Card Die then folded on the score lines.  Scallop Circle Punches of Real Red like little red petticoats peek out from (and form) the corners of the lid for a colorful element!

A tie of luxurious Real Red Satin Ribbon encircles the box; hearts stamped with the same set, punched with the Small Heart Punch (new!) and the Trio Heart Punch are adorned with a single red Rhinestone Brad and set atop the box for the final touch!

The final dimensions of the box are 2.5" square by 1.5" deep.  Can't you just see these boxes used for everything from handcrafted gift boxes for those very special small gifts, wedding and shower favors, Valentine's, birthdays or any occasion.  Just stamp and decorate accordingly and you'll make a big hit with them!

***Remember that $2. from every I {Heart} Hearts set purchased until February 28 will be donated to the Haiti relief fund by Stampin' Up!***

The color scheme of Red, Black and White is this Friday's Blogger's Challenge also!  You may check here to see the list of talented players and see what they have done with this challenge!  (Not everyone is able to participate every week).

Stamps:  I {Heart} Heart set #118571 (clear mount)
Ink:  Real Red, Basic Black
Paper:  Whisper White, Real Red, Basic Black
Accessories:  Big Shot, Petal Card Die, Scallop Circle Punch, 12" Paper Trimmer w/ cutting and scoring blades, Real Red Satin Ribbon, Small Heart Punch, Trio Heart Punch.

Thanks for dropping by.  I plan to post the Hanging Heart Box made with the Petal Card die tomorrow!

Margaret

Monday, February 1, 2010

I {heart} Hearts Jar for Valentine Gifting

Are you looking for an inexpensive but impressive gift for someone for Valentine's Day?  Here's an idea that combines a small glass jar with your papercrafting supplies to make a memorable little gift with a sweet touch!  These jars are about 4.5 inches tall and have the wires that hold the top closed.

The jar has a belly band of Melon Mambo cardstock that is rolled with the Whimsey Jumbo Wheel then edged with the Scallop Edge Border Punch.  Hearts stamped with the three hearts stamp from both the I {heart} Hearts set as well as the Love You Much set are punched out with the Heart to Heart Punch and adhered to the belly band.  A tie of Melon Mambo Polka Dot Grosgrain ribbon encircles the jar neck.

The top is decorated with the Scalloped Circle stamp from the Love You Much set, attached with a Stampin' Dimensional.  Over that is a 1 1/4" punched circle of Melon Mambo cardstock topped with the center of the same Scalloped Circle stamp stamped and punched out with the 1" Circle Punch.

Stamps:  Love You Much, I {heart} Hearts
Ink:  Melon Mambo; Pretty in Pink Marker
Paper:  Melon Mambo, Pretty in Pink, Whisper White cardstock
Accessories:  Glass jar, Melon Mambo Polka Dot Grosgrain ribbon, Stampin' Up!'s Sticky Strip Adhesive, Stampin' Dimensionals. Punches:  Scallop, 1" Circle, 1 1/4" Circle, Scallop Edge Border.

These are fun and easy to decorate and make a wonderful gift filled with small candies such as M&Ms, jelly beans or other favorites!  Anyone would love being remembered with a hand-decorated gift such as this!

Hope you get to stamp a little love for someone soon!

Margaret
Related Posts Plugin for WordPress, Blogger...