Showing posts with label Birds. Show all posts

Saturday, December 5, 2015

Christmas Dove of Peace

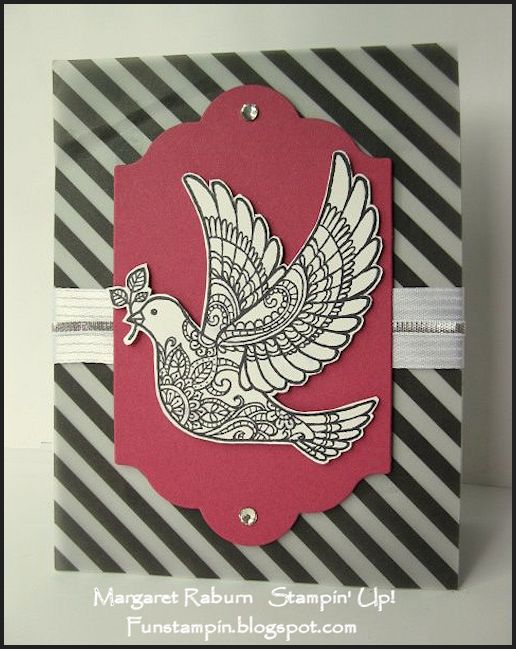
This Dove of Peace stamp is another one of the stamps that caught my eye when i first saw this year's Holiday Catalog.  I think it is so pretty, graceful and lends itself to being coloring or left uncolored. 


The black and white striped vellum makes a bold statement behind the Rose Red background behind the dove.

Two strips of the White 3/8" Stitched Ribbon were added to the card then one strip of the 1/8" Silver Ribbon was adhered over the seam to cover it and add sparkle and to the card before I attached the Rose Red background  Two Rhinestones were added to the Rose Red layer which add even more sparkle to this simple design.

On the inside I used the verse from the set and added a strip of Rose Red cardstock for contrast (no picture).


I have another card I made with this set where I colored in parts of the dove HERE:.

Stamps:  Dove of Peace set
Inks:  Basic Black Archival
Paper:  Smoky Slate, Rose Red, Whisper White cardstocks, Winter Wonderland Designer Paper Stack (striped vellum)
Accessories:  Lots of Labels Framelits, Rhinestones, Silver 1/8" Ribbon, White 3/8" Stitched Satin Ribbon.

Thanks for visiting!  Have a lovely weekend.


Oh, for the Dove of Peace to cover this world with His wings this Christmas.

Margaret

Thursday, October 10, 2013

World Treasures CCMC 272

It's time for the Thursday Create with Connie and Mary Challenge!  Today the challenge is a color one:  using Bermuda Bay, Rich Razzleberry and So Saffron for your project!
 

I really like the way these colors look together!  I used the proud peacock from the World Treasures set (that I haven't used enough!), embossed him on Whisper White cardstock using my firm foam Bermuda Bay ink pad and Clear Embossing Powder (you CAN emboss with the firm foam pads if they are well-inked, you have the embossing powder ready, pour it on the stamped image quickly and heat.)


I then used a Blender Pen and ink refils to color in his pretty feathers.  I added the tiniest Pearls and a Rich Razzleberry Glimmer Brad to dress up his tailfeathers even more.


The sentiment is also from the same set.  I colored it with markers before stamping, cut it out with the matching Apothecary Accents Framelit, then cut off the white edge and layered it onto a Rich Razzleberry piece cut with the same Framelit.  It is decorated with more tiny Pearls and two yellow Rhinestones colored with a Sharpie marker.

Here again are the Create with Connie and Mary Challenge CCMC272 colors:


Have you tried a challenge before?  Whether you've tried 0 or 100, you'll enjoy working with these colors and seeing what you can come up with!  Just visit Create with Connie and Mary, check out the other Challenge Team Member's cards and the guidelines then get your stamp on!!


Stamps:  World Treasures
Inks:  So Saffron, Bermuda Bay, Rich Razzleberry, and Stampin' Write Markers in these colors
Paper:  same as inks + Whisper White
Tools and Accessories:  Big Shot, Magnetic Platform, Modern Mosaic TIEF, Apothecary Accents Framelits, Paper Snips, Blender Pens, Dimensionals, Basic Pearls and Rhinestones.


Thanks for visiting!  Now, go forth and stamp!  (and have fun!)

Margaret

Friday, June 22, 2012

Happy Day 'n Betsy's Blossoms

I love the bold flowers, bird and other images in the Betsy's Blossoms stamp set!  It's so much fun to stamp with because it produces such "eye-pealing" images and vibrant colors!  Today's card uses Betsy's Blossoms (p. 72) and Friendly Phrases (p. 137), a fun and happy set of six phrases.
The card base is Daffodil Delight overlaid with a Whisper White layer that has been stamped with two flower images and the leaf image from the set.  There is also a rather large flower in the set which I didn't use here buthave used on another card that I'll post soon.  The larger flowers here are stamped with Raspberry Ripple ink (a new In Color), the small flowers with Daffodil Delight and the leaves with Wild Wasabi inks.

Here's a close-up of the Wild Wasabi cardstock banner that has been dry embossed with the Big Shot and the new on-trend Chevron Embossing Folder (#127749, $7.95).   This is really a "gotta-have"!  The bird was stamped in the new In Color, Midnight Muse, cut out and adhered with a Stampin' Dimensional.  A small Raspberry flower was stamped on a scrap and punched out with the 1/2" Circle Punch and adhered under the beak (but I see it has slipped; oops, I didn't notice it before I photographed it!).  I added Clear Dazzling Details to the center of each of the larger flowers for some bling, although it doesn't show up in the photo.

The "happy day to you" sentiment is from the Friendly Phrases set of six (#126149 [w], #126151 [c]).  I like these greetings because are fresh and bring an air of informality and fun to your projects!  

Thanks for dropping by!  I hope you enjoyed the card; I have more new cards to post soon!

Margaret
  

Saturday, August 28, 2010

Aviary in Pear and Blushing Bride

This is my last Aviary card I received in swapping at the recent Stampin' Up! Convention!  What fun to see all the creative ideas!  My friend, Gayle Enouen made this and I received it in a group swap. 
Gayle used the new Elegant Lines Embossing Folder and turned the embossed side down for a "debossed" look.  Blushing Bride and Pear Pizzazz with white form the soft feminine color scheme.   The birdcage is stamped in Pear Pizzazz ink and the little bird, one of four in the set, is stamped in the same Blushing Bride color.

The elegant greeting is stamped with the lovely new Curly Cute set (five different greetings).  One of Stampin' Up!'s gorgeous sparkly rhinestones graces the top of the cage!  Every girl has to have a little bling, you know!

Thanks for visiting!  The next set I'll be featuring is Just Believe, so come back soon to see these! 

Margaret

Thursday, August 26, 2010

Aviary Birthday!

I have another Aviary card for you today!  What a fun set!

  Today's card was also a swap I received at the Stampin' Up! Convention last month; it was
made by Deanna Allen of Utah.  A rich color scheme of So Saffron, the yummy new Cherry Cobbler and Early Espresso deep brown frame the white folded tag cut with the Two Tag Die and the Big Shot die cutting machine.  When you open the tag, it is stamped with "birthday" and the long legged bird from the set.  So clever!

The Saffron and Cherry Cobbler are dry embossed with the Square Lattice embossing folder and the Cherry has the lower edge treated with the Scallop Border Punch.   Don't you just love the new narrow Espresso ribbon with the white edges?  A perfect finish to an adorable card!  Thanks, Deanna, for sharing such a great card!

Thanks for visiting today!  I'll have more tomorrow!  See you then!

Margaret

Tuesday, August 24, 2010

Aviary

Aviary is one of the cutest new sets in the catalog, IMHO.  :)  These little whimsical birdcages and birds are adorable and just make you want to play!  Today I have two cards I received in swapping at the recent Stampin' Up! Convention; it's so much fun to see what ideas and designs everyone has come up with using new and current stamps and products!

This lovely card has no name on the back so I don't know who made it!  If it is yours, let me know as you deserve credit for your attractive card!  I love how the artist used the Scallop Square Punch to create the two underlying scallop corners for the birdcage layer.  Love this bright cheerful color scheme also!

Edited 8-26-2010  I received a sweet email last evening from Caren Curtis from Texas, but originally from here in the Oklahoma City area!!  She is the artist/creator of the above card and saw it on my blog here yesterday!!  What are the chances of that!!  I'm so tickled that she saw her work and let me know that she made this adorable card.  THANKS, Caren!!  Maybe I'll meet you at the Ft. Worth Stampin' Up! Regional?  How fun!

The second card was made by Amy Storrie of Texas.  Amy used the color scheme of Pumpkin Pie and Rose Red based on the Sweet and Sour Specialty Designer Paper; the bubble-look strip across the lower part of the card is one of the prints from that package.  I love how Amy brought in the new Pear Pizzazz color on the card base and through the ribbon also.

Both these cards use the same birdcage but there are actually four different ones in the set, as well as four different birds, including the cute little owl!  You'll have no end of fun using all these images in your creations!

Thanks for visiting today!  I'll have a couple more Aviary cards to post next time!

Margaret

Wednesday, February 24, 2010

Spring Sweet Treat!

Last week we had our "Stamp Therapy" meeting, five good friends who are Stampin' Up! demos!  We have such a great time sharing, problem solving, planning and stamping!  That is one of the greatest benefits of stamping and being a demo:  the friendships that you develop and enjoy!

Today's card was our Make 'n Take for the meeting, brought by Jann McCollom.  Isn't this just the cutest thing?!!  We all loved it!  It's another great way to use those wonderful little heart-shaped treat cups!

The bottom front of the card opens and you can stamp your greeting inside.  It is held closed by a Mini Library Clip with a ribbon adhered to it with a Mini Glue Dot.

There is a "trap door" on the upper back of the card to allow the candy to be removed without damaging the card.  The bird on the top is adhered to a tab on  top of the slider that holds the candy in.  You can see a picture of the back candy access below.

Isn't this creative!!  We all oooh-ed and ahhh-d over it and were thrilled to get to make one!  I'm sorry I don't have a template for cutting this card; I would share it if I did.

Stamps:  Sweetheart #120780 (clear mount)
Ink:  Only Orange, Green Galore, Tempting Turquoise
Paper:  Summer Sun, Whisper White
Accessories:  Mini Library Clips, 1" Circle Hole Punch, Round Tab Punch, Full Heart Punch, Paper Snips

All the Bold Bright colors make me so ready for spring!  We are all certainly ready for spring here in Oklahoma!  However the weatherman tells us to expect a good snowfall on Friday once again!  He did reassure us by saying this can't go on forever, lol!!  I hope that you are warm and safe wherever you are!

Hope you get some time to be creative and stamp today; it's good Therapy!!

Margaret

Friday, April 24, 2009

Friends 24/7 in Blue and Chocolate

Here is another card from my recent Stamp-A-Stack using a very popular set, Friends 24/7. And what a beautiful set it is! It includes this bird as well as a lovely damask stamp and others, six stamps in all.

I stamped the bird in Close to Cocoa on Whisper White cardstock then stamped the damask image in Sahara Sand around the bird like a background stamp. I added some color with the Stampin' Pastels and a cotton-tip swab, punched the corners with the Ticket Corner Punch and layered this onto Chocolate Chip with the corners also punched.

The card base is Sahara Sand. On a piece of Bordering Blue, I rolled the Friendly Words Jumbo Wheel in Sahara Sand for a very suble effect and adhered it to the card. A piece of chocolate dotted DSP was added to the base and Chocolate grosgrain ribbon was added to cover the seam between the two papers.

"Here for You" was stamped in Chocolate Chip on a small piece of Bordering Blue then punched out with the 1 1/4" circle punch and layered onto a 1 3/8" circle of white. This was layered on a Chocolate Chip punched scallop circle and dotted with the White Signo Gel Pen.

The bird piece was adhered to the upper blue portion of the card and the scallop circle adhered with Dimensionals.

Stamps: Friends 24/7 (#114218, $25.95), Friendly Words Wheel (#114696, $8.50)
Inks: Sahara Sand, Chocolate Chip, Close to Cocoa
Paper: Bella Rose Designer Series Paper; Bordering Blue, Chocolate Chiip, Sahara Sand, Whisper White
Accessories: Ticket Corner Punch, Scallop Circle Punch, 1 3/8 and 1 1/4" Circle Punches, 5/8" Chocolate Grosgrain Ribbon, Signo White Gel Pen, Stampin' Up! Chalk Pastels, Dimensionals.

REMEMBER to visit my blog on Monday between 5 a.m. CDT and midnight to start your tour on the Late Night Stampers BLOG TOUR!! Travel at your own speed, on your own timetable, and even in divided segments but the tour is MONDAY only! It consists of 19 blogs which will each have samples of different stamp sets and products from the Occasions Mini Catalog offering ideas and inspiration! Start here on my blog then you will find the link to the next blog and so on through 19 blogs, then end up here again. Come as you are but don't miss the bus! It will be fun, exciting and rewarding! (wink!)

Thanks for visiting!

Margaret

Thursday, April 16, 2009

Cheep Talk Bluebird

This is such a fun and whimsical set! It has two birds (the other one is a little larger than the one shown), three sentiments, a pear, a large and small flower, etc. for a total of eleven stamps! Great set!

This is one of thecards from my Stamp-A-Stack Monday and Tuesday. We had a lot of fun stamping and visiting!

Birds are such a hot trend in stamping and scrapbooking right now and this set just fills the bill! I colored the branch and leaves with markers then stamped. The other items were stamped using the Classic Inks and the Stamp-a-ma-Jig allowed us to place things where we wanted them! Gotta love that!

Stamps: Cheep Talk (I grin everytime I say that, lol)
Inks: Pacific Point (blue) and Summer Sun ink pads; Close to Cocoa and Old Olive Markers.
Paper: Good Morning Sunshine DSP; Summer Sun, Old Olive and Whisper White card stock
Accessories: Flower Brads (center colored with brown Sharpie), Pacific Point Striped Grosgrain ribbon, Stamp-a-ma-Jig.

Hope you enjoy! Thanks for visiting; have a great day!

Margaret

Monday, March 16, 2009

TSSC #61 Friends 24/7


It's Monday again and time for Monday Sketch Challenge #61. This is a simple sketch with a couple of interesting details. It has lots of possibilities for many different types of stamps, and especially larger images.

I used my new set, the lovely Friends 24/7 and the coordinating wheel Friendly Words. The background is Bordering Blue wheeled with Friendly Words then layered on olive. The large scallops were punched with the Rounded Tab Punch. I stamped the bird and branch with Basic Brown on Bordering Blue cardstock then watercolored with a Blender Pen, AquaPainter and ink refills, then cut out.


The sentiment is the new Oval All set of 4 images which fit the Large Oval punch. This was colored then layered onto a scalloped oval, which was punched out with the brand-new Scalloped Oval Punch. This is one of the items from the new Occasions Mini Catalog which will be available for order on April 1st (demos get to pre-order this month).

Stamps: Friends 24/7, Oval All, Friendly Words (jumbo wheel).Inks: Bordering Blue, Basic Brown, Riding Hood Red, Old Olive, Creamy Caramel, Close to Cocoa, Chocolate Chip, More Mustard.
Paper: Bordering Blue, Old Olive, Riding Hood Red, Chocolate Chip
Tools: Rounded Tab Punch, Ticket Corner Punch, Large Oval Punch, Scalloped Oval Punch, Paper Snips
Accessories: Rich Regal Brads, Dimensionals.

You can go to Technostamper's blog to check out the others who have made cards with this sketch, and try it yourself too!

Thanks for visiting! Come back soon, and take some time to smell the flowers (and to stamp!) :)

Margaret

Saturday, March 7, 2009

So Tweet Owlie!

My third card in the series of On Board So Tweet Chipboard creations is "Owlie" the Owl. This chipboard owl is a great size, fits on a card or looks great on the front of a bag or box or on a scrapbook page!

I used that great Good Morning, Sunshine Designer Series Paper for the background and to cover Owlie. See yesterday's post for the method of adhering the Designer Paper to the chipboard and again I used the Craft Ink Spots for coloring his beak, eyes and feet. I added wings by punching one Scallop Circle out of Chocolate Chip, cutting it in half then layering on him like I wanted and trimming off the excess.

For the moon behind him, I used a circle of So Saffron layered on a large scallop circle of Kiwi Kiss, which picks up one of the colors in the DSP. The card base is So Saffron cardstock, layered with Pacific Point and then the Good Morning Sunshine DSP. For the branch, I took a scrap of Chocolate Chip and ran it through the Big Shot with the "Distressed" Texturz Plate and it gave it a great rough look of bark! Gotta' love that Big Shot and Texturz Plates! Cool! I just cut it by hand into the branch. Easy!

Ink: Earth Elements Craft Spots: Summer Sun, Creamy Caramel, Chocolate Chip (#105438, set of 12, pg. 154, $25.95)
Paper: Good Morning Sunshine DSP (#113966, p. 160, $9.95); So Saffron, Kiwi Kiss, Chocolate Chip, Pacific Point, Sahara Sand cardstock
Tools: Big Shot (#113439, p. 193, $99.95), Scallop Circle Die (#113468, p. 197, $19.95), Circle Die, Scallop Circle Punch (#109043, p. 184, $15.95) , 1/2" Circle Punch (#104390, p. 184, $5.95), Sizzix Texturz Plates Kit #4 (#114531, p. 203, $9.95 set of 6 textures on 3 plates).
Other: On Board So Tweet chipboard (#113893, p. 182, $14.95, 80+ pcs.)

If you don't already have a demo and wish to order any of these products, just go to my Stampin' Up! website by clicking here and then click on the "shop now" button. If you need any information, just email me from my website. Thanks!

Hope you get some time to be creative this weekend! It's de-stressing and good for your health!

Have fun stampin'! Thanks for visiting and come back soon!

Margaret
Friday, March 6, 2009

Good Morning Sunshine, So Tweet!

I am having so much fun using the new On Board So Tweet chipboard assortment from the SU Spring Summer Catalog! It has oodles of images (there are more than 80!) just waiting to be decorated and used for cards, scrapbooks, 3D projects and whatever else you can think of ! The oh, so popular bird images are just adorable and they have branches and flowers to accompany them on your projects! There are eight of each image in the package so you can just chip chip chip away non-stop! How fun!

Here's a TIP: Covering your chipboard is so easy, even a caveman can do it! lol! Really though, you just lay your selected chipboard down on your paper, pencil around it, then cut it out. I use SU Glue Stick (which is SO easy and inexpensive, and it bonds wonderfully well!) and cover the backside of my paper and the front of my chipboard, then place the paper onto the chipboard and smooth it out with my fingers. The glue dries fast so make any placement adjustments quickly. Use a sanding block to smooth the paper edges. Done! Then embellish to your hearts content!


On today's project I used the smaller bird, the branch and one flower from the package. The card is 6x6" Chocolate Chip Textured Cardstock. Wow, is that cardstock wonderful! I layered Baja Breeze cardstock that had been run through the Big Shot with the Flourish Texturz Plate onto the chocolate. Here's a great thing: the Texturz Plates are wide enough to texturize a 5 3/4" square piece of cardstock!! Wow, that's huge!

I used the Craft Ink Spots to cover the bird's feet, legs and beak then also the branch. The Craft Ink dries more slowly than the Classic dye ink, so you can set it aside while you do other things, OR you can dry it with the heat tool that you usually use for embossing. I then covered the little bird and flower with Good Morning Sunshine Designer Series Paper and punched out a "sun" from the same, layering that on Summer Sun (that was appropriate! lol!)

I took a strip of the small dots paper and clipped it finely all across for "grass" and adhered it to the base of the card. I ran one of the tag dies from the Sizzix set Lots of Tags through the Big Shot on three different cardstocks so I could layer the sentiment on coordinating colors.

The only other thing was to just put it all togeter! I used Mini Glue Dots to adhere the chipboard images to the card so they are stuck well! :) Oh, did I mention that this chipboard coordinates with some of SU's stamp sets (Cheep Talk, pg. 90, Good Friend, pg. 91 and goes great with Owl Together Now, pg. 14)? How smart is that! No more struggling to "make" things work together when they are already designed to! Love that!

Stamp set: sentiment from Upsy Daisy set
Ink: Old Olive Classic; Old Olive, Summer Sun and Creamy Caramel from the Earth Elements Craft Ink Spots set (#105438, set of 12, pg. 154, $25.95)
Paper: On Board So Tweet Chipboard (#113893, p. 183, $14.95), Good Morning Sunshine Designer Paper (#113966, pg. 160, $9.95), Chocolate Chip 12 x 12 Textured cardstock; Whisper White, Baja Breeze, Summer Sun, Pacific Point card stock
Accessories: Fire Round Rhinestone Brads, Big Shot, Flourish Texturz Plate, Lots of Tags Sizzlit die, Glue Stick, Circle Punches, Mini Glue Dots

If you don't already have a Stampin' Up! demonstrator, you may order any of these products online through my Stampin' Up! website here. Just click on the "Shop Now" button and go for it! Need help? Contact me through my website or leave a comment here.

Hope you enjoy! Have you used any of the OnBoard Chipboard yet? It is so much fun! Tomorrow I'll be posting an owl from the same So Tweet assortment and Good Morning Sunshine DSP.... stay tuned...

Happy Friday! TGIF!

Margaret

Wednesday, August 27, 2008

Pretty Amazing!

Isn't this just Pretty Amazing?! That's actually the name of the stamp set used, but I think it perfectly describes the card itself too! This card was made by Judy DiScipio; she gave it to me at an online group meeting in Salt Lake City at the Stampin' Up! Convention a few weeks ago. I haven't stopped ooooohhhing and ahhhhhhh-ing over it since! Her coloring on the hummingbird and cutting/layering on the flower are just impeccable. The touch of glitter on the belly of the little bird is a perfect highligh for this stunning card!

This type of card is called a Spring Card; it stands up by itself! Judy had posted a different spring card to our online group a few weeks before the tutorial showed up on Splitcoast. Here is the link to the directions for making this card fold: http://www.splitcoaststampers.com/ee/index.php/resources/tutorials/spring_card/.

Judy obviously is a very talented stamper! She doesn't have a blog but if you want to leave her a comment, you may do so here. She gave me her permission to post her card and I'll let her know about any messages left here for her.

Thanks again, Judy, for such a beautiful card! I just love it!

Have a stamping good day!
Margaret

Edited To Add: This stamp set, Pretty Amazing, is not in the current catalog but is on the Dormant List, which means that it can still be ordered until January 18. (#111006, $20.95)

Saturday, July 5, 2008

Sneak Peek: Owl Together Now!

I hope everyone is having a wonderful weekend as we in the USA celebrate our July 4th Independence Day!

I received this card in a Sketch Challenge on one of my online stampers' groups. The person sending to me was Ida Krause; she used this stamp set called Owl Together Now! It was a gift to the demonstrators on the Stampin' Up! Bermuda Cruise Incentive trip this past April. It will be available in the Fall/Winter 08 Catalog which will be available for ordering on August 11! The use of bird images has been wildly popular the past year or so and now owls are a hot trend! This big-eyed fella is so cute sitting on his branch! I understand there are other clever owl sayings and images in this set also. I can't wait to see the new catalog and see what else Stampin' Up! has in store for us! The new catties will be here and in effect on August 11!

Stamps: Owl Together Now
Inks: Tempting Turquoise, Black
Paper: Bali Breeze Designer Paper; Whisper White, Pumpkin Pie, Old Olive
Accessories: Felt Fusion flowers, Rhinestone brads

Thanks, Ida, for such an adorable card!

You can see the sketch and the card I made for this challenge HERE.
Have a great weekend! Happy Stampin'!
Margaret

Wednesday, April 23, 2008

Two Pocket Card

At our April demo meeting we made these clever two pocket cards. They are a perfect use for the double-sided Designer Series Paper as both sides of the paper will show on the finished card. The pattern can be found in the Oct/Nov 2007 Technique Junkies newsletter (the Online Bonus). See http://www.techniquejunkies.com/ for more information.

I used this design from the Bali Breeze Designer Series Paper which has flowers on one side and an Old Olive print on the other. You can see the olive in the upper righthand corner and side. Two cards fill the pockets, which is fun because you can decorate them with stamps and still have plenty of room for greetings and personal messages.

I used the Always set which is one of my current favorites. It has so many images that make it so versatile.

The last picture shows the back portion open; a variation is to adhere it closed and put the brads through that layer also.

Sets: Always
Paper: Bali Breeze DSP; Groovy Guava, Old Olive and Whisper White cardstock.
Inks: Old Olive, Groovy Guava
Accessories: Round Tab and Three For You (flowers) punches; bone folder, Cutter Kit (distressing tool), Earth Elements brads, Signo White Gel Pen.

Happy Wednesday everyone!
Margaret

Sunday, March 9, 2008

Tulsa Regional!

Saturday I attended the Stampin' Up! Regional meeting for demonstrators in Tulsa, OK. What a fun day! We had informative and inspiring presentations, took pictures, ate chocolate, received a new stamp set and also got to stamp! We made several cards and two scrapbook pages! I'll be sharing those with you soon!

Here's our group during the Make 'n Take stamping. L to R is Kimberly (Robin's upline), Robin (my daughter and upline), myself and Stacie, my downline. What an enjoyable day!

This is the card I made for a Splitcoast swap at the Regional using one of my favorite sets, Always. It was a small swap but fun, and I got to meet some ladies in person that I had "seen" online, so that was a great treat! Stamping is all about relationships so what fun to meet new stamping friends, and some actually live fairly close to where I live! We talked about getting together and stamping sometime!

Don't you just love the filigree on this bird stamp? I embossed him in White ep to give him shine and dimension. The background rectangle is white glossy cardstock done with embossing resist: Stamp in VersaMark on glossy cardstock, emboss in clear, brayer or apply color with sponge then stamp again with the darker ink. Easy technique!

Set: Always. Wheel: Baroque Border. CS: Rose Red, Certainly Celery, Glossy White. Inks: Versamark, Rose Red, Certainly Celery. Other: 1/2" circle punch, BoHo Blossoms punch, White embossing powder, Embossing Buddy, White Taffeta Ribbon, brayer, sponge, alcohol.

Hope you've had a good weekend and didn't lose too much sleep with the time change!

Keep on stampin'!

Sunday, February 3, 2008

Technostamper Challenge #3

It's time for week 3 of the Technostamper Sketch Challenge already! Here's this week's sketch Mary Jo sent us:


Here my card using one of my favorite new sets, Always.

Set: Always, Tres Chic, Stitched (both background stamps)
Cardstocks: Purely Pomegranate, River Rock, Whisper White
Inks: Purely Pomegranate, River Rock
Accessories: Corner rounder, 1 1/4", 1 3/8", and 1/2" circle punches, stitched Pomegranate grosgrain ribbon, Dimensionals, Crafter's Tool Kit or Mat Pack, Signo White Gel Pen .

I stamped images from the Always set then punched them out and layered them. The River Rock background is stamped with the Stitched background stamp in River Rock ink which makes for a subtle backdrop for the rest of the card. The Tres Chic stamp is on the Purely Pomegranate cardstock and the words and designs are visible, readable yet still not competing with the focal point, which is the four image circles. Use of the layering circle punches makes this come together quickly. The corner punch is used to make the scalloped edge and the white faux stitching with the white gel pen repeats the stitching in the ribbon.

This was a fun sketch! Thanks, Mary Jo! Check out her blog for a list of links to the other stampers in our sketch group. Can't wait to see what they did with this sketch. Even better, use the sketch to make a card yourself and post it on your blog or Splitcoast gallery and link it to either mine or Mary Jo's blog here! Play along with us every week if you want!

Happy Stamping!
Related Posts Plugin for WordPress, Blogger...