Showing posts with label Sizzlets/Embosslits. Show all posts

Thursday, May 2, 2013

To Die For Color Challenge CCM250

Well, Big Shot dies, really ... I used two different dies on this card for today's Create with Connie and Mary Thursday Challenge, as well as two Sizzlets!   The challenge colors are Pool Party,  Calypso Coral and Basic Gray, and here's my card:


This is a fun color challenge using two of my favorite colors:  Pool Party and Calypso Coral!  I'm so glad they are returning to the Stampin' Up! color line-up as standard colors instead of being retired!  The Basic Gray provides good contrast for these light and bright colors!


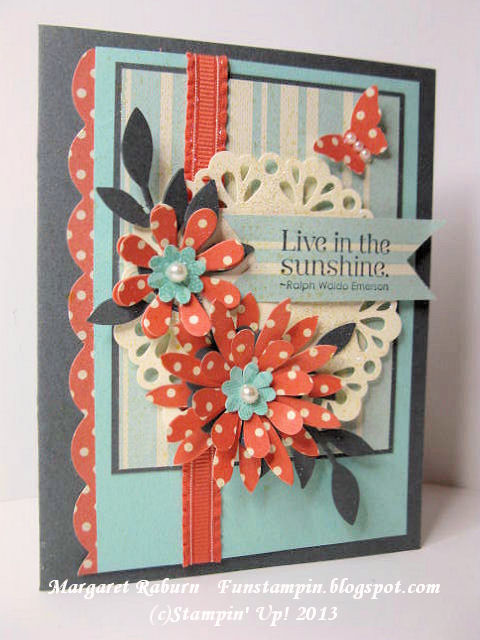
I used the Blossom Party Originals Die and polka dot Tea for Two Designer Series Paper for the flowers  and Boho Blossoms Punch for the small Pool Party centers.  The leaves are cut with the Little Leaves Sizzlet, which is a a must-have for me!  The doily was diecut with the Large Delicate Doilies Sizzlet; the polka-dot scallops were diecut with the Tasteful Trim BigzXL Die.  The little polka-dot butterfly was punched with the Bitty Butterfly Punch


The Comfort Cafe Designer Series Paper is the source for the striped Pool Party dsp and the greeting is from the retiring Pursuit of Happiness set; I've really used this set a lot and will miss it!   I love the flowers that are made with this Blossom Party Originals Die; I need to use this more!  Basic Pearls center both the flowers and butterfly.

Thanks for visiting today and I appreciate your comments.  Try this super color combination for a card yourself, post it somewhere online then add your card link to the challenge post at Create with Connie and Mary CCM250!

Have a stampin' good day!

Margaret

Sunday, March 10, 2013

Print Poetry Birthday Wishes

Birthday cards...seems we're always in need of them so when I saw Technostamper's Sketch Challenge 253 this week, that's the direction I went.
The Print Poetry Designer Series Paper Stack is the source for these papers in Gumball Green, Primrose Petals, Very Vanilla and a touch of Summer Starfruit.  I really like the combination; it looks so fresh and spring-y!  

Here's the original sketch from Technostamper: 

It's simple and straightforward!

I used a tiny Gumball Green and Vanilla print for the background.  I ran it through the Big Shot with the Flower Garden Embossing Folder. Some of the white core of the paper showed, which was very cool, so I touched it lightly with a Sanding Block to expose just a tiny bit more!

The green was layered on a Primrose Petals cardstock and then on a Very Vanilla card.

The Birthday Wishes stamp is from the Bring on the Cake set (love that font)!  I gently sponged Summer Starfruit ink onto a Paper Daisy and added a Primrose Petal In Color Dahlia in the center.  (In real life the Dahlia matches the cardstock!  Don't know why it looks so different here...)

(c)Stampin' Up!    by Margaret Raburn
I decided to go with the Primrose leaves as they accented the design more than green (a little artistic license perhaps); they were cut with the indispensible Little Leaves Sizzlit in the Big Shot!  If you don't have it, you NEED it!  : )   The entire front was spritzed with the Vanilla Smooch Spritz for a little shimmer.

Stamps:  Bring on the Cake
Ink:  Primrose Petals, Summer Starfruit
Paper:  Print Poetry Designer Series Paper Stack; Very Vanilla, Primrose Petals, Gumball Green cardstock
Accessories:  In Color Dahlias, Vanilla Smooch Spritz, Paper Daisies
Tools:  Paper Snips, Big Shot, Flower Garden Embossing Folder, Little Leaves Sizzlet


Print Poetry Paper Stack   48 4" x 6" double-sided sheets   #129312  
Little Leaves Sizzlit    #114511     $5.50
Flower Garden Embossing Folder     $7.95
Bring on the Cake    set of 13  #121899w  $38.95,    #121958c  $27.95

Thanks for coming and hope you will come back to visit soon!  Have a good weekend!

Margaret
 

Thursday, March 7, 2013

Fabulous You!

Don't most girls love fabulous shoes?  Well, have you seen the one in the 2012-13 Stampin' Up! Catalog on page 39?.  This high heel shoe is a melange of flowers and butterflies so pretty, even Cinderella would be jealous!  Maybe the set should be called "Fabulous Shoe"?  lol!
I stamped the shoe in Basic Black ink on Whisper White cardstock which had already been dry embossed with the Big Shot and the Tulip Frame Embossing Folder.  Then I stamped the shoe again on a piece of scrap cardstock and cut it out, saving the outside "frame" to use as a mask.  I put some temporary adhesive on the back of the mask so it would hold it steady to the cardfront and keep the ink off the background.  I then used Sponge Daubers to apply inks in various colors to the shoe.  After coloring, the shoe layer was adhered to the Wisteria Wonder card base.

 
I adhered one of the flowers from the very popular Vanilla 5/8" Flower Trim with Glue Dots then added some Dazzling Details to some of the flower centers and tips of the flower.  A small Daffodil Delight butterfly die cut with the Beautiful Wings Sizzlet reflects the Daffodil color used in the shoe and embellishes the sentiment.

I made about forty-six of these for an organized swap at the Dallas Stampin' Up! Regional in February, and received some lovely swaps in return! -- one of the great things about attending a Stampin' Up! event!


Fabulous You    #126520w  $14.95     #126522c   $11.95


Beautiful Wings Embosslit     #118138   $11.95


Modern Label Punch   #119849    $16.95
Sponge Daubers    #102892    Pkg. of 12      $10.95
You may purchase these or any other Stampin' Up! products from my secure online Stampin' Up! store HERE using Mastercard, Discover or Visa, and they will be shipped directly to your door from Stampin' Up!   You may also order through me  OR order at your next Stampin' Up! party!  Please contact me through my Stampin' Up! website HERE if you have any questions about ordering and I would be happy to answer your questions.

Hope you enjoyed the shoe!   Thanks for dropping by; come back to visit soon!

Margaret

Tuesday, January 15, 2013

Happy Hearts and Primrose Petals!!

Only available SIX more days!  That's right, the Happy Hearts stamp I used on my card today is a special Valentine bundle  from Stampin' Up! available only until January 21!  The bundle includes this single stamp as well as a package of 1" x 8" cellophane self-sealing bags that are perfect for making and giving treats to those who are sweet (and everyone else, too!  lol!) 
I discovered that this stamp is perfectly punched out with the Full Heart Punch (#119883)!  How quick and easy!
I stamped the largest heart in the Hearts a Flutter stamp set then die cut it with the coordinating Framelit in the set by the same name and attached the Happy Heart with Dimensionals.  Underneath the ribbons I layered a 1-3/8" doily cut with the Sizzix Delicate Doilies Sizzlets L (#126999 p. 191) out of a fun new product in the Spring Catalog:  White Creped Filter Paper (#129393).  I was pleased how nicely it cut with the Sizzlit and Big Shot!
In this picture you can see the three tiny pearls I added to the little heart.  What you can't really see is the Dazzling Details and Vanilla Shimmer Spray I added for sheen and sparkle!  I also added some small punched hearts inside the card.

Stamps:  
Happy Heart single stamp bundle, $5.95
Hearts a Flutter set and Hearts a Flutter Framelits, available as a set for savings of 15%

Ink:
Primrose Petals ink

Paper:  
More Amore Designer Series Paper (#129309, new!)
First Edition Specialty Paper (#121878)
Very Vanilla, Primrose Petals, Basic Black cardstocks
Creped Filter Paper (#129393, new!)

Accessories: 
Honeycomb Embossing Folder (#129378, new!), 
Black Scallop Dotted Ribbon
Vanilla 1/8" Taffeta Ribbon
Basic Pearls
Dazzling Details
Vanilla Shimmer Spray
Heart Punch  (#117193, $5.95)

You may order all these products online (remember Sale-a-Bration products will be available beginning January 22, 2013) through my ONLINE Stampin' Up! STORE and your order will be delivered directly from Stampin' Up! to your door by UPS!  If you are a local-to-me customer, if you wish, you may contact me to order: mraburn @ cox. net (remove spaces before using address).

For more information on the two Valentine stamp specials, please click here.  Remember these expire the day before Sale-a-Bration begins, so don't wait!  Order now!


Thanks for visiting today!  Hope you have fun stampin' soon!

Margaret

Saturday, August 11, 2012

Birthday Reason to Smile

Oops, I found that I didn't get this card posted during July when this Reason to Smile stamp set was available for purchase!  However, since so many people have it now, I thought I would post the card anyway, and the idea could easily be used with a different stamp.

The card is 4-3/8" square Whisper White cardstock diecut with the Big Shot and the Scallop Square Bigz Die.  Before cutting, I folded the white and placed the fold just below the top scallops of the die to keep from cutting it.  
Next is a layer of Tangerine Tango cardstock overlaid with a square of Daffodil Delight Polka Dot Parade Designer Series Paper, one of my very favorites from this catalog (of course, I like them ALL but this was the very first on my list of must-haves!!)  
I diecut the medium doily on the Delicate Doilies Sizzle from Tempting Turquoise cardstock.  Next is the stamped image  (Two Step Stamping:  background flower in Daffodil Delight then the lines stamp in Tangerine Tango.)  I used Whisper White Baker's Twine tied through a Daffodil Delight button from the Bold Brights Collection.  Lastly is the sentiment stamped with "happy birthday" from the Itty Bitty Banners set and diecut with the coordinating Bitty Banners Framelit.  Having all these wonderful Big Shot and die tools make projects so much faster and yet have so much detail, and so easy!!

Note:  Even though this is a square card, it WILL fit into the standard A2 envelope for mailing or giving

You can purchase these and/or any other Stampin' Up! products from my secure online Stampin' Up! store HERE using Mastercard, Discover or Visa, and they will be shipped directly to your door from Stampin' Up!

Have a lovely weekend, and I hope you have a chance to stamp!  (It's good therapy, you know!!)

Margaret
Polka Dot Parade Designer Series Paper      #106902      $10.95 

Wednesday, January 18, 2012

Flirtatious Flower Fusion Valentine

Wow, that's a mouthful!  LOL!!  But, yes, it does describe my post today:  a card made with Stampin' Up!'s Flirtatious Specialty Paper, the Flower Fusion Sizzlet and it's also a Valentine (although you could easily change the message to make it for another occasion).  I made this card for a challenge in an online group of which I'm a member.
The color scheme of Melon Mambo, Pretty in Pink and Whisper White is from this beautiful print from the Flirtatious paper package.  The Flower Fusion Sizzlet was used to cut the flowers except for the leaves and tiny center flower.   The leaves are actually punched from Luscious Limeade cardstock using the Doily Triple Layer Punch and then I trimmed a little scallop off from between each "leaf".   The tiny So Saffron center flower is punched with one of the Itty Bitty Shapes Punch Pack punches that happens to match the Flower Fusion Sizzlet
I cut one Whisper White heart with the Scalloped Heart of Hearts Sizzlet (#117332) then arranged the flowers around it.  The sentiment from Teeny Tiny Wishes was stamped then punched with the Word Window Punch then layered on a Pretty in Pink Modern Label punchout that has been sponged with  ink.  Tiny Pearls were added to the center of each flower and also to each end of the Modern Label Punch, although those were added after I took these pictures : (. 

Thank you for visiting today!  I hope you will come back soon, and in the meantime, here is a link to the amazing 2012 Occasions Mini Catalog  so you can see all the wonderful and new products available to us!  Enjoy!

Margaret

Tuesday, January 17, 2012

Fresh Vintage Doily

Umm, how much fun is it legal to have playing with the new products from the new Occasions Mini and Sale-A-Bration catalogs??!  Lots I hope, because I am!!  Otherwise, I'm in trouble (well, I am anyway!  LOL!)  This just HAS to be the BEST mini catalog Stampin' Up! has released yet!!
I was looking through some cards I'd done awhile back and found one done with this color scheme of Basic Black, Whisper White and River Rock.  This combination turned out quite elegant so thought this would be a great time to use it again!  The doily is offset to the left then a Black Satin Ribbon knot, black dry embossed small butterfly and tiny tag are offset to the right to balance the design.  The tag is stamped with "love" from the Tiny Tags set and is adorned with Pearls as is the butterfly cut with the Beautiful Wings Sizzlit (cuts and embosses in one step!)
I love Stampin' Up!'s new large Paper Doily Sizzlit Die!  (#125592)  Now we can make our own paper doilies any color we wish, or even out of Designer Paper!  Fabulous!  I cut mine from Whisper White cardstock and centered it with a River Rock circle that had been heat embossed with an image from Fresh Vintage, a set available only during Sale-A-Bration (it is FREE with a $50. purchase!)  It's a beautiful set and is perfect for vintage, shabby chic projects, yet it can also work with the "clean" look too!
Here's a close-up of the center and you can see the tiny self-adhesive Basic Pearls used to adorn it.  These just have to be one of the very BEST and definitely easiest embellishments to use!

Here's our small butterfly... doesn't the dry embossing from the Sizzlit add a lot of pizazz?

I know you'll love the products from this mini as well as the Sale-A-Bration mini!  Be sure you make it to a Stampin' Up! party soon so you can see many of these products and projects in person!!  If you are in my area, contact me and we can arrange that!!  Otherwise, contact your local Stampin' Up! demonstrator which can be found on the www.stampinup.com website and look for "demonstrator locator".  (My friends and customers please don't do that, lol!)

All Stampin' Up! products can also be ordered from me or online at my official and secure Stampin' Up! website HERE!

Thanks for visiting today!  Would love to hear from you (leave a comment) and hope you'll come back soon to visit!  I'll be posting some more projects using Occasions Mini and Sale-A-Bration products soon!

Margaret

Tuesday, June 21, 2011

Retiring Simple Flower Embosslit

Hello again!  I've been to a family reunion and a stampin' retreat since I last posted!  Whew!  I'm still recovering from all the activity!  I was one of the planners for the retreat and spent a lot of time preparing for it beforehand so there hasn't been any stamping that I could post until after it was over.  I'll be posting some of those projects very soon.

Today's card is a very sweet one sent to me by a fellow Stampin' Up! Demonstrator Pam Jones-Litchenburg, who is in the local group with which I meet monthly.  She sent it with a very nice note inside. : )
Pam used the Simple Flower Embosslit to cut and emboss (all at the same time!) these pretty flowers with the Big Shot, then centered each with a self-adhesive Pearl.  The leaves were cut with the Little Leaves Sizzlit, one of my very favorites because it adds so much to a project!  Pam also used a tiny butterfly cut with the Beautiful Wings Embosslit on a stamped and punched Large Oval.

The Simple Flower Embosslit is being retired but is still available for purchase (#114514,
Simple Flower Embosslits Die, p. 215, $7.17, (40% off!) until June 30!  Shop for retiring products, some discounted, at my online Stampin' Up! store here!
  Thanks!

The background is white run through the Big Shot with the Perfect Polka Dot Embossing Folder for interesting texture.  You can see how much Pam made use of her Big Shot to make this card!!  What did we ever do without the Big Shot!!  Love it!  Thank you so much for the lovely card and the sweet note, Pam!

Thanks for coming by!  I will have pictures of retreat to post soon!

Margaret

Saturday, February 19, 2011

Fun Flowers in Melon & Black

Wow!  Gotta' love this new FUN FLOWER DIE from Stampin' Up!  It makes the most gorgeous flowers and they couldn't be easier!  Just run it through the Big Shot with your cardstock, a few swipes with your Bone Folder for shaping (not necessary but gives it dimension), and you have a beautiful flower for any papercrafting project!
The Melon Mambo color is one of my favorites and combined with Black and Vanilla (or White), it packs a visual punch!  This paper if from the Love Letters Designer Paper Pack, again one of my favorites this year!  I combined two of the great DSP prints for the background, added a bit of Melon Mambo done with the Scallop Trim Border Punch and some elegant Black Satin ribbon .  A small butterfly cut and embossed in one trip through the Big Shot in the Beautiful Wings Embosslit rests on the black satin, with two tiny Pearls on his body.
Above is a side view of the flower.  I used Black for the leaves to stay with the color scheme.  For the center of the flower, I didn't have any of the black Glimmer Brads (which I do love!) so I improvised and used a chocolate 5/16" brad, covered it lightly with Crystal Effects, dipped it in Chunky Black Glitter from the Chunky Essentials (pk of 4, #108797).  I let it dry before inserting it in the middle of my flower layers and I am very happy with the way it looks!  : )
 On the inside, I put a narrow strip of the same DSP as on the front, added two more Melon Mambo tiny butterflies that were also cut out with the Beautiful Wings Embosslit.   The birthday greeting is from a wonderful greeting stamp set called Curly Cute which is in the main catalog page 149.

One more side view:

All products are from Stampin' Up!
Thanks for visiting today!  Have a great weekend!

Margaret

Thursday, December 9, 2010

Christmas Frame II, in Red

I've made several more of the Peace Joy Love & Cheer frames since I posted Tuesday evening!  Five, in fact!  I had a request for one in red so here it is.  I think that was a good idea; I'm liking it!  What do you think?
I changed out the Baja Breeze background DSP for this Real Red DSP print from the retired 2009 Christmas Cocoa DSP and used Wild Wasabi for the mid-sized punched snowflakes.  I used Early Espresso cardstock for the words die cut (Join in the Cheer #113452, $21.95) and changed the three small snowflakes to Real Red.

I wish you could see how sparkly this is in real life!!  The white snowflakes are solid with Dazzling Diamonds glitter and they are totally eye-catching!!  The three small snowflakes punched out with the circle punch are covered with Dazzling Diamonds, too, making it so, well, umm, dazzling, for lack of a better word!  lol! 

You can see Tuesday's frame here for more details.  Which one do you favor?

Thanks for dropping by today!  Hope to see you again soon!

Margaret

Tuesday, December 7, 2010

Christmas Frame

It's been awhile since I've made any "name frames", as they are often called but I saw one Saturday at our demo group gift exchange that inspired me (I believe it was made by Pam Jones).  I had to make one because I knew I had just the spot for it on my kitchen window ledge and the colors are just great!  I changed it up slightly (as we always do!) and was delighted that it went together pretty fast!) 
 The Big Shot is a must-have for this project and makes it go pretty quickly!  The words are cut from Chocolate Chip Textured Cardstock with the "Join in the Cheer" Decorative Strip die.  The large snowflake is cut with the Snowflake #2 Die.  The medium size snowflakes are punched out with the Snowflake Extra Large Punch.
 This Snowflake was diecut from Whisper White cardstock then coated with glue (Two-Way Glue Pen) then covered with Dazzling Diamonds glitter.  A punched red snowflake is layered on and is high lighted with a large sparkling self-adhesive Rhinestone.
Another snowflake is formed by layering a white over a red snowflake, adding Dazzling Diamonds glitter to the white one, then adding another Rhinestone to the center.  The small snowflakes were stamped, glitter added with glue pen and punched out with a 3/4" Circle Punch before adding Rhinestones to their centers.  This picture was taken without the glass in the frame to avoid glare in the photos, but the glass was reinserted for display.
The Candy Cane Christmas Designer Paper was used for the background and also the stripe across the bottom.  It has been extremely popular for Christmas projects!  Regrettably it is out of stock and no longer available but Stampin' Up! has many other beautiful papers!

I also made one in predominately red; it is posted here.

Thanks for visiting today and hope you visit again soon!

Margaret

Friday, November 6, 2009

Dasher in Soft Suede

Dasher is such a beautiful stamp! I ordered it right away when I saw it in the new catalog! Seems I wasn't the only one as it is one of the best-selling Stampin' Up! stamps. Another really popular item is the Petals-A-Plenty Embossing Folder; it gives such a luscious deep impression for stunning backgrounds.

For this card today Dasher is stamped in Soft Suede onto Sahara Sand cardstock; these two colors work together so well. Dazzlling Diamonds Glitter has been applied to Dasher's "antlers"; you can see it a little bit in the larger image. This is layered onto Soft Suede cardstock that has the bottom edge treated with the Scallop Edge Punch.

The card base is Soft Suede with a layer of Whisper White added on top. Then over that is a piece of Melon Mambo cardstock embossed with the Petals-A-Plenty Embossing Folder run through the Big Shot die cut machine to give it a deep and gorgeous impression. Tip: Use Mini Glue Dots on the back of the embossed cardstock for good adherence to the other layer without smashing your embossing.

A Whisper White snowflake diecut with a Sizzlet has been sponged with Frost White Shimmer Mist; it is centered with a Silver Brad that has Dazzling Diamonds Glitter applied to make it sparkle!

Stamps: Dasher
Inks: Soft Suede
Paper: Soft Suede, Whisper White, Melon Mambo, Sahara Suede
Accessories: Petals-A-Plenty Embossing Folder, Big Shot, Snowflakes #2 Sizzlet set of 4, Glue Pen, Dazzling Diamonds Glitter, Silver Mini Brads, Glue Dots, Scallop Edge Punch.

This non-traditional colored Christmas card was an easy one to make but has lots of panache!

Thanks for visiting today.

Margaret
Related Posts Plugin for WordPress, Blogger...