Welcome to our Thursday Challenge at Create with Connie and Mary! We are doing things a little differently this week; we're having a Design Team Blog Hop!! How fun!
Our Challenge this week is color: use Calypso Coral, Crumb Cake and Basic Gray for our project!
I thought these colors would work well for a Father's Day card so I set to work. I embossed both the Crumb Cake and Basic Gray layers with the Alphabet Press embossing folder. Two strips of the Calypso Coral Chevron Ribbon were wrapped around the Crumb Cake layer before it was adhered to the Basic Gray card base.
I used the Six-Sided Sampler set to stamp three hexagons for the front Basic Gray layer; this layer was then adhered to the Crumb Cake with Dimensionals. The embellishments use are two Pearls that were colored metallic silver with a Sharpie marker and a Basic Metal Button tied with Linen Thread.
The greeting was stamped with Happy Father's Day from the Delightful Dozen set; the ends of the cardstock were trimmed with the Hexagon Punch before attaching with Dimensionals. Two Calypso Coral Candy Dots embellish it.
Stamps: Delightful Dozen, Six Sided Sampler
Inks: Calypso Coral, Crumb Cake, Basic Gray
Paper: Whisper White, Basic Gray, Crumb Cake
Accessories: Basic Metal Buttons, Basic Pearls, Subtles Candy Dots, Linen Thread, Calypso Coral Chevron Ribbon, Hexagon Punch, Alphabet Press Embossing Folder, Big Shot, Dimensionals, Glue Dots.
Here is the Color Challenge from Create with Connie and Mary this week:
We hope you will join us this week by making a card or project using these colors! Then just upload your project someplace so we can see it online and link it to this Color Challenge Post on Create with Connie and Mary CCMC300.
Now for the Blog Hop! The next Challenge Team member after me is Connie Babbert. Click below to go to her blog, then each team member's blog will direct you to the next team member in line. Follow each around the loop until you get back to Nicole Tugrul's blog! Thanks for joining us today!
Thanks for visiting today, and don't forget to join the challenge!
Happy blog hopping!
Margaret
Showing posts with label Masculine Cards. Show all posts
Thursday, April 24, 2014
Tuesday, July 30, 2013
Six-Sided Sampler for the Guys
Yesterday I promised you a more masculine version of the Six-Sided Sampler card I posted so here it is!! Crumb Cake, Early Espresso, Calypso Coral and Bermuda Bay are the star colors today!
The layout is the same, just a change in color scheme and a few details. I spattered the Honeycomb embossed background with my AquaPainter and Early Espresso Ink, and lightly spattered the Very Vanilla background for a more rustic look.
Instead of little punched flower embellishments, today we have punched stars. I'm so glad the Merry Minis Punch Pack carried over from the 2012 Holiday Catalog so we have this little Star Punch!! (To see what other holiday products were carried over and are currently available, click on the "Holiday Carryover" tab at the top of the page. If you are reading this via email, you can click HERE to come to the blog page to see the carryovers.)
In place of the flower-patterned hexagon, I opted for the "woven" image. The Crumb Cake background layer was double-wrapped with Early Espresso and Calypso Coral Bakers Twine which also ties down the button over the birthday greeting banner.
It was fun to challenge myself to make both a masculine and feminine version of the same layout! Have you done this also? Did you find it easy?
Stamps: Six-Sided Sampler, Banner Greetings (Hostess only set of 6)
Cardstock: Very Vanilla, Crumb Cake, Early Espresso, Calypso Coral, Bermuda Bay
Ink: Early Espresso, Calypso Coral, Bermuda Bay
Accessories: Neutrals Collection button, Early Espresso Baker's Twine, Calypso Coral Baker's Twine
Tools: Big Shot, Honeycomb TIEF (embossing folder), Hexagon Punch, Merry Minis Punch Pack (star), AquaPainter, Paper Snips.
Remember that the Six-Sided Sampler set and the coordinating Hexagon Punch are available as a product "Bundle" which will save you 15% over purchasing them separately... and that also includes 15% less tax and shipping too!! Yay!
*For more information on the money-saving Product Bundles in the current catalog, please click on the BUNDLES tab at the top of this webpage. If you received this post by Email, you can click on this link: http://funstampin.blogspot.com/p/blog-page_20.html
All of these and any Stampin' Up! products can be purchased on my secure Stampin' Up! website HERE: margaret.stampinup.net Once there just click on the "SHOP NOW" button to enter the store. Thank you for shopping with me!
Thanks for visiting today! I hope you enjoyed the card and get to do some stamping soon! It's a great stress-reliever!
Margaret
The layout is the same, just a change in color scheme and a few details. I spattered the Honeycomb embossed background with my AquaPainter and Early Espresso Ink, and lightly spattered the Very Vanilla background for a more rustic look.
Instead of little punched flower embellishments, today we have punched stars. I'm so glad the Merry Minis Punch Pack carried over from the 2012 Holiday Catalog so we have this little Star Punch!! (To see what other holiday products were carried over and are currently available, click on the "Holiday Carryover" tab at the top of the page. If you are reading this via email, you can click HERE to come to the blog page to see the carryovers.)
In place of the flower-patterned hexagon, I opted for the "woven" image. The Crumb Cake background layer was double-wrapped with Early Espresso and Calypso Coral Bakers Twine which also ties down the button over the birthday greeting banner.
It was fun to challenge myself to make both a masculine and feminine version of the same layout! Have you done this also? Did you find it easy?
Stamps: Six-Sided Sampler, Banner Greetings (Hostess only set of 6)
Cardstock: Very Vanilla, Crumb Cake, Early Espresso, Calypso Coral, Bermuda Bay
Ink: Early Espresso, Calypso Coral, Bermuda Bay
Accessories: Neutrals Collection button, Early Espresso Baker's Twine, Calypso Coral Baker's Twine
Tools: Big Shot, Honeycomb TIEF (embossing folder), Hexagon Punch, Merry Minis Punch Pack (star), AquaPainter, Paper Snips.
Remember that the Six-Sided Sampler set and the coordinating Hexagon Punch are available as a product "Bundle" which will save you 15% over purchasing them separately... and that also includes 15% less tax and shipping too!! Yay!
*For more information on the money-saving Product Bundles in the current catalog, please click on the BUNDLES tab at the top of this webpage. If you received this post by Email, you can click on this link: http://funstampin.blogspot.com/p/blog-page_20.html
All of these and any Stampin' Up! products can be purchased on my secure Stampin' Up! website HERE: margaret.stampinup.net Once there just click on the "SHOP NOW" button to enter the store. Thank you for shopping with me!
Thanks for visiting today! I hope you enjoyed the card and get to do some stamping soon! It's a great stress-reliever!
Margaret
Monday, May 27, 2013
You Rule!
Such a fun set from the Spring Catalog is YOU RULE! I finally ordered it not long before I received the NEW Catalog and sadly this set is not included! : ( I have seen so many creative and cute cards with it online so I know I will still enjoy it anyway! It's quite versatile and works for either men or women!
In searching for colors for a masculine card, I discovered that Bravo Burgundy looks quite good with Summer Starfruit! I don't recall seeing this combo previously, but I really like it (oh yeah, now that Bravo Burgundy is retiring, lol!) I used a little Basic Gray as well, and like the combination.
The background DSP is a print in Summer Starfruit print from Comfort Cafe DSP pack wrapped with the 3/8" Stitched Satin Ribbon, also in Summer Starfruit. The crown was stamped in the same color then diecut with one of the smaller Oval Framelits. The Basic Gray was cut with the next larger Oval Framelit.
The greeting is one of four from the set; it was stamped in Basic Gray on a 1/2" Very Vanilla strip (a good way to use your scraps, too!), the ends fish-taled then adhered to the top layer and anchored with a Pewter Glimmer Brad (from the Basic Glimmer Brads, which is perfect with the Basic Gray!
Did you notice that I placed a 1/4" smaller-that-the-card layer on the front, popping it up on Dimensionals? This really gives a nice and more finished look to the card. I've observed other cards like this; I like the look and have begun doing this often myself!
I left it pretty simple but jewels or brads or Dazzling Details could be added to the crown if one desired to bling it up! (definitely for a feminine card!) It just depends on who you're sending it to as to how you want to accessorize it! That's the beauty of stamping- we can personalize our cards! This would be great for Father's Day, a masculine birthday or an event of occasion when someone was being honored or celebrated!
YOU RULE stamp set: #129261 wood mount, $17.95; #129264 clear mount, $13.95
Bravo Burgundy products are listed on page 155 of the current 2012-2013 Catalog and can be ordered through June 3, or as long as supplies last, whichever is first.
Order through my online store HERE
Thanks for visiting today!
Margaret
In searching for colors for a masculine card, I discovered that Bravo Burgundy looks quite good with Summer Starfruit! I don't recall seeing this combo previously, but I really like it (oh yeah, now that Bravo Burgundy is retiring, lol!) I used a little Basic Gray as well, and like the combination.
The background DSP is a print in Summer Starfruit print from Comfort Cafe DSP pack wrapped with the 3/8" Stitched Satin Ribbon, also in Summer Starfruit. The crown was stamped in the same color then diecut with one of the smaller Oval Framelits. The Basic Gray was cut with the next larger Oval Framelit.
The greeting is one of four from the set; it was stamped in Basic Gray on a 1/2" Very Vanilla strip (a good way to use your scraps, too!), the ends fish-taled then adhered to the top layer and anchored with a Pewter Glimmer Brad (from the Basic Glimmer Brads, which is perfect with the Basic Gray!
Did you notice that I placed a 1/4" smaller-that-the-card layer on the front, popping it up on Dimensionals? This really gives a nice and more finished look to the card. I've observed other cards like this; I like the look and have begun doing this often myself!
I left it pretty simple but jewels or brads or Dazzling Details could be added to the crown if one desired to bling it up! (definitely for a feminine card!) It just depends on who you're sending it to as to how you want to accessorize it! That's the beauty of stamping- we can personalize our cards! This would be great for Father's Day, a masculine birthday or an event of occasion when someone was being honored or celebrated!
YOU RULE stamp set: #129261 wood mount, $17.95; #129264 clear mount, $13.95
Bravo Burgundy products are listed on page 155 of the current 2012-2013 Catalog and can be ordered through June 3, or as long as supplies last, whichever is first.
Order through my online store HERE
Thanks for visiting today!
Margaret
Thursday, May 23, 2013
Comfort Cafe CCMC253 Sketch Card
Pursuit of Happiness sentiment set is one I have used many times so I was really sad to see it on the Retirement List, but glad I do have it. I especially like this verse I used on my card for this week's Create with Connie and Mary CCMC253 Sketch Challenge.
The Designer Series Papers are from the Comfort Cafe package. These are great colors to create with: Pool Party, Soft Suede, Cajun Craze, Crumb Cake, Midnight Muse and Summer Starfruit. I thought they would make a great masculine card with this sketch!
I stamped a layer of Pool Party with the sentiment in Cajun Craze and then scored three sides with the Simply Scored Board. Look closely and you can see that I scored the chevron paper on the vertical between each column of angles. It is more apparent in person and gives it a little "puff". : )

Midnight Muse Ribbon wraps around the top of the Pool Party layer and is topped with a Naturals Button tied with Linen Thread and layered over a circle of Summer Starfruit.
I hope you will chose to use this easy sketch to make a card yourself! Just post it on your blog or other public site on the web then link up on the Create with Connie and Mary sketch challenge #253 post!
Thanks for visiting! Hope you get to have some stamp time soon!
Margaret
The Designer Series Papers are from the Comfort Cafe package. These are great colors to create with: Pool Party, Soft Suede, Cajun Craze, Crumb Cake, Midnight Muse and Summer Starfruit. I thought they would make a great masculine card with this sketch!
I stamped a layer of Pool Party with the sentiment in Cajun Craze and then scored three sides with the Simply Scored Board. Look closely and you can see that I scored the chevron paper on the vertical between each column of angles. It is more apparent in person and gives it a little "puff". : )

Midnight Muse Ribbon wraps around the top of the Pool Party layer and is topped with a Naturals Button tied with Linen Thread and layered over a circle of Summer Starfruit.
I hope you will chose to use this easy sketch to make a card yourself! Just post it on your blog or other public site on the web then link up on the Create with Connie and Mary sketch challenge #253 post!
Thanks for visiting! Hope you get to have some stamp time soon!
Margaret
Thursday, May 9, 2013
The Open Sea CCMC251
It's Thursday! Time for the Create with Connie and Mary Thursday Challenge #251 ... today it's a sketch!
I really like The Open Seas set and am so glad it didn't retire; it makes such wonderful masculine cards! I found this handsome designer paper with a world map print in delicious colors of blues and greens in the current but retiring Fan Fair Designer Series Paper package .. layered on Very Vanilla it's perfect for my ship!
I stamped the ship in Midnight Muse and added some subtle colors with Stampin' Write Markers and Blender Pens, cut it out and attached it to the focal rectangle with Dimensionals.
The card base is Crumb Cake. I randomly stamped a layer of Island Indigo with the round global map, wrapped Island Indigo Bakers Twine around then attached the layer with Dimensionals. "Happy Father's Day" was stamped in Midnight Muse onto Old Olive cardstock, punched with the Word Window Punch then attached with Dimensionals.
Here is the sketch for this week's Create with Connie and Mary Challenge #251:
There is so much you can do with this sketch, from masculine to feminine, kids to seniors, simple to vintage! Why don't you try your hand at a card using this sketch, upload it somewhere on the 'net and then link it to the challenge #251 at Create with Connie and Mary this week?! Having a sketch is such a great starting point for making a card!! We'll be waiting to see yours!
Thanks for visiting!! Hope you will drop by again soon!
Margaret
I really like The Open Seas set and am so glad it didn't retire; it makes such wonderful masculine cards! I found this handsome designer paper with a world map print in delicious colors of blues and greens in the current but retiring Fan Fair Designer Series Paper package .. layered on Very Vanilla it's perfect for my ship!
I stamped the ship in Midnight Muse and added some subtle colors with Stampin' Write Markers and Blender Pens, cut it out and attached it to the focal rectangle with Dimensionals.
The card base is Crumb Cake. I randomly stamped a layer of Island Indigo with the round global map, wrapped Island Indigo Bakers Twine around then attached the layer with Dimensionals. "Happy Father's Day" was stamped in Midnight Muse onto Old Olive cardstock, punched with the Word Window Punch then attached with Dimensionals.
Here is the sketch for this week's Create with Connie and Mary Challenge #251: There is so much you can do with this sketch, from masculine to feminine, kids to seniors, simple to vintage! Why don't you try your hand at a card using this sketch, upload it somewhere on the 'net and then link it to the challenge #251 at Create with Connie and Mary this week?! Having a sketch is such a great starting point for making a card!! We'll be waiting to see yours!
Thanks for visiting!! Hope you will drop by again soon!
Margaret
Wednesday, May 16, 2012
Totally Tool
So many wonderful sets are retiring to make room for the new Catalog ... and one of them is Totally Tool! It's great for masculine cards with the tool images plus it includes a clever saying with each tool. Totally Tool* (#113256, $25.95 w) is also great used for projects other than cards like 3-D projects, scrapbooking, tags, and gift wrappings.
I used a color scheme based on the strip of Well Worn Designer Paper* (#122359. $10.95), one of my favorites from this past year's catalog. Great colors are Soft Suede, Not Quite Navy, Cajun Craze and Crumb Cake. The layer of Not Quite Navy was treated to a pass through the Big Shot with the Perfect Details Texturz Plate* (#115962, $3.95) giving it the diamond-pattern embossing; this was adhered to the Soft Suede card. A 5/16" brad from the Naturals Assortment* (#112534, $4.17, 40% off!) catches a strip of the Artichoke Jeans Ribbon* (#125054, $4.17, 40% off) which adorns the Designer Paper. I used the Distressing Tool that is part of the Cutter Kit* (#106958, $16.95) to roughen the edges of the Designer Paper; it's such a great multi-purpose tool and I'm sorry to see it retire!
For the focal image I used the screwdriver stamp with accompanying saying stamped on Crumb Cake cardstock. The corners were treated with the Ticket Corner Punch* (#119867, $6.95) then sponged with Soft Suede ink. I used the three piece Mat Pack* (#105826, $9.95) and Paper Piercing Tool* (#116631, $3.50) to punch the upper and lower edges of the image for added interest then adhered it to the card with Dimensionals.
Everything on this card with the exception of the cardstock, inks and Dimensionals is retiring! I hate to see this set go and have enjoyed using it, particularly for "guy" cards! If you want it, better get it now as it won't be available any more after May 31! Actually, these stamps can also be used for "gal" cards, think stampers....? : )
If you wish to purchase any of these or other Stampin' Up! products, just click HERE to go to my official online Stampin' Up! shopping website! If you wish, you may also contact me through that website.
Thanks for visiting today! Hope to see you again soon!
Margaret
*Retiring products, available only until May 31, or as long as supplies last.
Friday, April 20, 2012
Loved Ones Masculine Card
It seems that cards for the guys in our lives are usually in the shortest supply in our card stashes... I hear this a lot, don't you? The Loved Ones set in the Occasions Mini (that ends on April 30!!) can be a great help in meeting this need. Here is a Make 'n Take card for the guys we did at a recent workshop:
Crumb Cake (aka Kraft) usually a good choice for a masculine card, is the card base here. I used the retiring Grunge Rock stamp set (for the first time, arghhh!! but still love it!) and stamped these great and appropriate stamps in the same CC ink onto the card for a tone-on-tone look. A delightful find for this card was this print from the Pocketful of Posies Designer Series Paper package (that sounds not-so-promising but ended up great for a masculine card, doesn't it, lol!) I like the geometric pattern as well as the colors of Early Espresso, Soft Suede, Baja Breeze used, which all work well for our purpose. Starting from the left is a panel of this print, then a swath of Early Espresso cardstock with a Baja Breeze Seam Binding Ribbon tie.
"For my" and "Dad" are two separate stamps in the Loved Ones (#125465 {w}, #125467 {c}) set; the ladies were also given the choice of using the "Brother" or the "Son" stamp in this useful set of 12. (p.s. The Curly Label ExLg Punch {#119851} was the perfect size for the "Son" stamp). These were stamped in Early Espresso onto Baja Breeze cardstock then punched out with the Decorative Label Extra Large Punch (#120907). This piece was then sponged with the same Baja Breeze ink and adhered to the front with Stampin' Dimensionals. My colors look a little off in the photo but in real life they look just right together (mea culpa on the photog skills...sorry).
REMEMBER these important dates:
- April 25: Retiring Accessories List announced by Stampin' Up!
- April 30: Last day to order from the Occasions Mini Catalog
- April 30: Last day to order from the Summer Smooches April Promotion; the adorable Summer Smooches Fabric Brads and Summer Smooches Decor Stencil will not be available in the new catalog; they are an April only item!
- May 31: Last day to order from the 2010-2011 Idea Book and Catalog
- June 1: NEW Stampin' Up! Annual Catalog in effect!!
Thanks for visiting! Have a wonderful weekend and hope you get to do something that you enjoy!
Margaret
Saturday, May 21, 2011
The Open Sea Masculine Card - CCMC-SUM01
One of the great new sets in the Summer Occasions Mini is The Open Sea! This set comes at just the right time of the year when we are preparing to make our Father's Day cards, graduation cards or birthday cards for the men in our lives. This one just fits the bill for those projects! Strong, sturdy, direction, adventurous... are some of the ideas that come to mind with this set. This was a Make & Take for my workshop this past Thursday too!
I so like this Nautical Expedition Designer Paper and the color scheme of Cherry Cobbler, Not Quite Navy, Early Espresso and Basic Grey! The stripe from that collection is the basis of the color scheme for my card today; I did add Sahara Sand and Whisper White cardstocks to the mix as a neutral colors for my composition too. I am also posting this card to Create with Connie and Mary Summer weekly challenge CCMC-SUM01 today as these are the colors for the Challenge this week!
Love the compass; I added just a touch of color with my Blender Pen and Cherry Cobbler inkpad to make it pop; an antique pewter mini brad in the center makes a fitting accent.
You can see the layers from this angle; also notice the new Baker's Twine in Cherry Cobbler and White! It also comes in Early Espresso/White and solid White; this is a great new accessory and is a very inexpensive way to accent your projects!
All these products can be ordered online through my Stampin' Up! store right HERE! Be sure to order through my store and not directly through the Stampin' Up! website in order to get preferential pricing and also be able to earn Hostess Benefits on qualifying orders of $150. or more!
Don't forget the 30% Off Specials for the month of May and National Scrapbooking Month!! There are some wonderful and wonderfully useful stamp sets on sale! My very favorite is Word Play (can you ever have enough words/sentiments for your cards & projects? I can't!). Another favorite is the Printed Petals; Grunge Rock if you have tweens, teens or grandchildren,... you get the idea! These sets are all good for stamping cards and projects, scrapbooking, 3-D projects et all! Order through me (contact me here) or my online store before the end of May!
Check out the My Digital Studio (for digital scrapbooking, card-making, printing, the list is endliess..!!) Specials while you're there! And 30% Off Printing!! The My Digital Studio downloads must be ordered through my online store and you will be able to immediately download them to your computer! No shipping cost either!! What a deal!
Thanks for visiting today! Have a great weekend!
Margaret
I so like this Nautical Expedition Designer Paper and the color scheme of Cherry Cobbler, Not Quite Navy, Early Espresso and Basic Grey! The stripe from that collection is the basis of the color scheme for my card today; I did add Sahara Sand and Whisper White cardstocks to the mix as a neutral colors for my composition too. I am also posting this card to Create with Connie and Mary Summer weekly challenge CCMC-SUM01 today as these are the colors for the Challenge this week!
Love the compass; I added just a touch of color with my Blender Pen and Cherry Cobbler inkpad to make it pop; an antique pewter mini brad in the center makes a fitting accent.
You can see the layers from this angle; also notice the new Baker's Twine in Cherry Cobbler and White! It also comes in Early Espresso/White and solid White; this is a great new accessory and is a very inexpensive way to accent your projects!
All these products can be ordered online through my Stampin' Up! store right HERE! Be sure to order through my store and not directly through the Stampin' Up! website in order to get preferential pricing and also be able to earn Hostess Benefits on qualifying orders of $150. or more!
Don't forget the 30% Off Specials for the month of May and National Scrapbooking Month!! There are some wonderful and wonderfully useful stamp sets on sale! My very favorite is Word Play (can you ever have enough words/sentiments for your cards & projects? I can't!). Another favorite is the Printed Petals; Grunge Rock if you have tweens, teens or grandchildren,... you get the idea! These sets are all good for stamping cards and projects, scrapbooking, 3-D projects et all! Order through me (contact me here) or my online store before the end of May!
Check out the My Digital Studio (for digital scrapbooking, card-making, printing, the list is endliess..!!) Specials while you're there! And 30% Off Printing!! The My Digital Studio downloads must be ordered through my online store and you will be able to immediately download them to your computer! No shipping cost either!! What a deal!
Thanks for visiting today! Have a great weekend!
Margaret
Monday, April 4, 2011
Plane & Simple for Brother
I wanted to make a card for my brother's birthday and this is the perfect set. When we were growing up, he made innumerable model airplanes; after college he was an engineer in the aircraft industry! I couldn't wait to make this card for him! I hope he likes it!
I chose the Elegant Soiree Designer Series Paper for my color scheme. The patterned paper is one of my favorite from the package and it contains all the colors used in the card: Baja Breeze, Crumb Cake, Soft Suede and Very Vanilla.I used Technostamper's Monday Lunchtime Sketch Challenge for the layout. The card base of Soft Suede is stamped on the right side with the great border stamp from the set; the DSP strip was applied to the left side. A layer of Crumb Cake was stamped with the goggles, texture applied with the Square Lattice Embossing Folder then layered onto Baja Breeze.
The plane was stamped on Baja Breeze with Soft Suede then layered on Soft Suede cardstock which was sponged with the same color ink, making it look a good bit darker. The plane layer was sponged also, and two of the corners were treated with the Ticket Corner Punch. Three 1/4" circle punchouts were layered on the down the right side.
Thanks for dropping by! Take a minute and say hello?
Margaret
Thursday, April 8, 2010
All Holidays: Father's Day Card
Masculine cards don't seem to come as easy to many of us as do cards for our female friends and relatives. True?
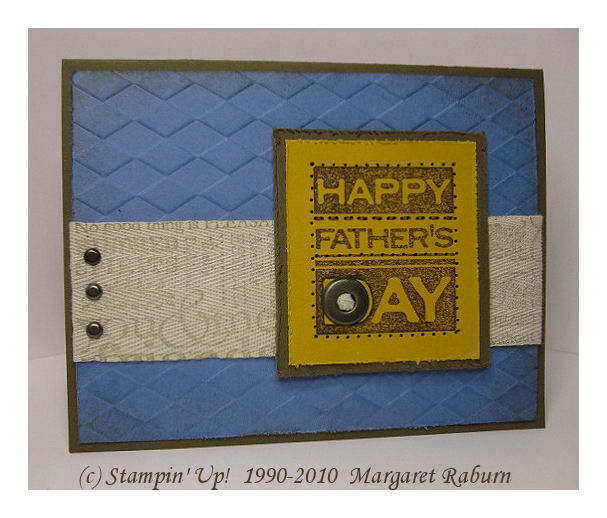
The "Happy Father's Day" greeting is from the versatile All Holidays stamp set of 12. I really like it's boldness as well as it's straightforward font and reverse coloring. The greeting was stamped in Soft Suede onto Crushed Curry cardstock and added a Jumbo Grommet in Antique Brass to the "D" for emphasis and tucked a very small piece of Twill Ribbon into the center hole.
The Brocade Blue background layer was run through the Big Shot with the Harlelquin Texturz Plaate for that marvelous texture. A length of the widest Twill Tape was wheeled with the Friends Jumbo Wheel then adhereded to the Brocade Blue with three Antique Mini Brads added to the left side. The blue cardstock was then layered onto a Soft Suede card.
There it is, pretty quick and easy packing a punch with layered textures and a bold greeting! We can't think too soon about Mother's and Father's Day card, can we? :)
Thanks for visiting today! I love for you to say "hi" and leave me a note that you were here.
Have a great weekend!
The "Happy Father's Day" greeting is from the versatile All Holidays stamp set of 12. I really like it's boldness as well as it's straightforward font and reverse coloring. The greeting was stamped in Soft Suede onto Crushed Curry cardstock and added a Jumbo Grommet in Antique Brass to the "D" for emphasis and tucked a very small piece of Twill Ribbon into the center hole.
The Brocade Blue background layer was run through the Big Shot with the Harlelquin Texturz Plaate for that marvelous texture. A length of the widest Twill Tape was wheeled with the Friends Jumbo Wheel then adhereded to the Brocade Blue with three Antique Mini Brads added to the left side. The blue cardstock was then layered onto a Soft Suede card.
There it is, pretty quick and easy packing a punch with layered textures and a bold greeting! We can't think too soon about Mother's and Father's Day card, can we? :)
Thanks for visiting today! I love for you to say "hi" and leave me a note that you were here.
Have a great weekend!
Margaret
Tuesday, April 6, 2010
Totally Tool Card
I can always use some "man" cards, can't you?...although this set isn't limited only to men because many women are handy with tools also, right? This set, Totally Tool, is fun to work with and a little different from most of the other sets Stampin' Up! offers. Each of the five tool images has a saying underneath it; these can be mounted with the image or mounted on the side of the block, giving you more flexibility with it. You can also use the omitting technique, using a marker to ink only the part of the stamp you wish to use.
For the cards today, I chose to use the full stamp including the image. These cards were for a fast make and take in a short period of time. The first one is more simple than the second. The image was stamped and colored with a Blender Pen and Going Grey ink then mounted on Old Olive and a Silver Mini Brad attached to each corner.
To give this card something of an "industrial" look, I wrapped a piece of heavy duty aluminum foil around a piece of cardstock then ran it through the Big Shot with the Harlequin Texturz Plate to give an interesting background layer. This is really easy and adds so much to the card. You may wish to use a shim to give more pressure to the Big Shot "sandwich"; I used a sheet of copy paper but each machine may be calibrated a little different so you might need to experiment to get the best results.
The card base is Old Olive with a layer of Not Quite Navy on top. I used Dimensionals to attach the top two layers to the cards.
The next card has an additional step in it's construction. If you look closely, you can see that I used the Woodgrain background stamp, stamping it in Not Quite Navy ink on the NQN cardstock. This gives a little more depth and textural interest to the card.
The use of the aluminum foil is an easy technique which gives light and reflectivity to the card and really dials up the pizazz! Just handle the pieces carefully during construction of the card to keep from compressing the texture.
I hope you enjoyed these simple cards. This set offers a lot more possibilities; these cards are just a fun start!
Thanks for visiting! Hope to see you again soon! Try this technique and post a link to your creation in the comments section of this post so we can see what you did with it! Have fun!
For the cards today, I chose to use the full stamp including the image. These cards were for a fast make and take in a short period of time. The first one is more simple than the second. The image was stamped and colored with a Blender Pen and Going Grey ink then mounted on Old Olive and a Silver Mini Brad attached to each corner.
To give this card something of an "industrial" look, I wrapped a piece of heavy duty aluminum foil around a piece of cardstock then ran it through the Big Shot with the Harlequin Texturz Plate to give an interesting background layer. This is really easy and adds so much to the card. You may wish to use a shim to give more pressure to the Big Shot "sandwich"; I used a sheet of copy paper but each machine may be calibrated a little different so you might need to experiment to get the best results.
The card base is Old Olive with a layer of Not Quite Navy on top. I used Dimensionals to attach the top two layers to the cards.
The next card has an additional step in it's construction. If you look closely, you can see that I used the Woodgrain background stamp, stamping it in Not Quite Navy ink on the NQN cardstock. This gives a little more depth and textural interest to the card.
The use of the aluminum foil is an easy technique which gives light and reflectivity to the card and really dials up the pizazz! Just handle the pieces carefully during construction of the card to keep from compressing the texture.
I hope you enjoyed these simple cards. This set offers a lot more possibilities; these cards are just a fun start!
Thanks for visiting! Hope to see you again soon! Try this technique and post a link to your creation in the comments section of this post so we can see what you did with it! Have fun!
Margaret
Saturday, November 21, 2009
Autumn Days III
While making sample cards with the Autumn Days set, I saw this design by Amy Celona and loved it... so I just had to "case" it! :) Hers was actually a stationery holder but I thought it would be great for a man's birthday card. Since I'm always needing those, I changed a couple of things and adapted it to a card. The layout features three designs from the beautiful Autumn Traditions Designer Series Paper and the pheasant from the Autumn Days stamp set. They are both just wonderful! Combine those with the circle and scallop circle die cuts from the Big Shot and dies, and you have a card that isn't hard to do but has lots of visual interest.
The pheasant was stamped with Soft Suede ink on Whisper White cardstock, cut out and added to the focal point with Dimensionals. The sharp little Paper Snips make cutting out images like the pheasant so easy... if you don't have a pair, you need them! : )
I loved Amy's original project and thank her for the inspiration! I appreciate those stampers who share so freely of their talent and creations.
Stamps: "Autumn Days"; "Teeny Tiny Wishes"; inside birthday greeting from "On Your Birthday" set
Ink: More Mustard, Soft Suede, Really Rust, Sage Shadow
Paper: Autumn Traditions DSP; More Mustard, Soft Suede, Very Vanilla, Whisper White cardstock
Accessories: 1/4" Chocolate Chip Grosgrain ribbon, Big Shot, Scallops #2 Die, Circles #2 Die, Stampin' Sponge, Dimensionals, Paper Snips, Word Window Punch, Modern Label Punch
Thanks for visiting! Have a great day!
Margaret
Tuesday, November 17, 2009
Autumn Days and Autumn Traditions
As we wend our way toward winter and Christmas, I couldn't resist making a few more autumn cards. I love the warm rich colors of this time of year as well as the cooler temperatures.
I used my new Autumn Days set and the beautiful coordinating Autumn Traditions Designer Series Paper for this card which was designed for a workshop make and take. The background of Sahara Sand was first stamped in Sahara Sand with one of the plant stamps then run through the Big Shot with the "Distressed" Texturz Plate to give it a subtle and interesting texture. (I love those Texturz plates and use them all the time!) A piece of the colorful stripe from Autumn Traditions DSP was then added down the left side before placing it on the Soft Suede card base.
Two of the plant stamps were stamped in Sahara Sand on the More Mustard cardstock then the pheasant was stamped in Soft Suede. A layer of Ruby Red was added before adhering this focal image to the card.
The final touch is the greeting from Teeny Tiny Wishes stamped in Ruby Red, punched with the Word Window Punch then layered onto a Modern Label punch-out of Soft Suede. This made a quick and easy card for my workshop. Seems we can never have enough cards for the guys in our lives and this set lends itself perfectly for this purpose!
Stamps: Autumn Days, Teeny Tiny Wishes
Ink: Soft Suede, Sahara Sand, Ruby Red
Paper: Autumn Traditions DSP; Sahara Sand, Soft Suede, More Mustard, Ruby Red cardstock
Accessories: Word Window Punch, Modern Label Punch, Mat Pack, Paper Piercer, Texturz Plate Kit #4, Big Shot
You can order any of these items from my Stampin' Up! website here or contact me through that website to place an order with me personally.
Thanks for dropping by. You are always welcome here! Have a creative day!
Margaret
I used my new Autumn Days set and the beautiful coordinating Autumn Traditions Designer Series Paper for this card which was designed for a workshop make and take. The background of Sahara Sand was first stamped in Sahara Sand with one of the plant stamps then run through the Big Shot with the "Distressed" Texturz Plate to give it a subtle and interesting texture. (I love those Texturz plates and use them all the time!) A piece of the colorful stripe from Autumn Traditions DSP was then added down the left side before placing it on the Soft Suede card base.Two of the plant stamps were stamped in Sahara Sand on the More Mustard cardstock then the pheasant was stamped in Soft Suede. A layer of Ruby Red was added before adhering this focal image to the card.
The final touch is the greeting from Teeny Tiny Wishes stamped in Ruby Red, punched with the Word Window Punch then layered onto a Modern Label punch-out of Soft Suede. This made a quick and easy card for my workshop. Seems we can never have enough cards for the guys in our lives and this set lends itself perfectly for this purpose!
Stamps: Autumn Days, Teeny Tiny Wishes
Ink: Soft Suede, Sahara Sand, Ruby Red
Paper: Autumn Traditions DSP; Sahara Sand, Soft Suede, More Mustard, Ruby Red cardstock
Accessories: Word Window Punch, Modern Label Punch, Mat Pack, Paper Piercer, Texturz Plate Kit #4, Big Shot
You can order any of these items from my Stampin' Up! website here or contact me through that website to place an order with me personally.
Thanks for dropping by. You are always welcome here! Have a creative day!
Margaret
Friday, June 19, 2009
Blogger's Challenge 103 - Manly Cards
Just in time for Father's Day, the Blogger's Challenge this week is for manly cards.
I ordered this Happiness is a Journey set not long after it came out. I so like realistic train sets that I couldn't resist this one, and the sentiment that comes with it is great: "Happiness is a journey, not a destination." Sadly, it is now retiring so I wanted to use it once again before it was gone. It makes great "manly cards"; this was my opportunity!
My paternal grandfather was a railroad engineer of a diesel locomotive but any railroad engine brings back thoughts of him. I remember him as the strong quiet type but he was kind-hearted and generous. When we would go visit he and my grandmother across town in Ft. Worth almost every Sunday afternoon, as we were leaving he would always reach in his pocket for his little leather coin purse and pull out some coins for my brother and I. What a treat! We could ride our bicycles to the drugstore the next day and buy some candy! He worked for the Texas & Pacific Railway for over fifty years! He also loved working with his hands and doing woodwork in his workshop. Great memories!
I ordered this Happiness is a Journey set not long after it came out. I so like realistic train sets that I couldn't resist this one, and the sentiment that comes with it is great: "Happiness is a journey, not a destination." Sadly, it is now retiring so I wanted to use it once again before it was gone. It makes great "manly cards"; this was my opportunity!My paternal grandfather was a railroad engineer of a diesel locomotive but any railroad engine brings back thoughts of him. I remember him as the strong quiet type but he was kind-hearted and generous. When we would go visit he and my grandmother across town in Ft. Worth almost every Sunday afternoon, as we were leaving he would always reach in his pocket for his little leather coin purse and pull out some coins for my brother and I. What a treat! We could ride our bicycles to the drugstore the next day and buy some candy! He worked for the Texas & Pacific Railway for over fifty years! He also loved working with his hands and doing woodwork in his workshop. Great memories!
We made a card almost exactly like this last night for the make and take at my workshop so I kept it rather simple. I was pretty happy with the result; hope you enjoy it.
Stamps: Happiness is a Journey; "Thinking of You" from Trendy Trees set; "Happy Father's Day" inside from All Holidays
Ink: Not Quite Navy
Cardstock: Taken with Teal, Ruby Red, Going Gray (how long since I used THAT!)
Accessories: Big Shot, Texturz Plate (on background), Word Window Punch, Small brad from Star Brads Asst.
You can see a list of the other Blogger's Challenge gals here; take some time to see what they came up with!
Hope you have a wonderful Father's Day with your loved ones and make some good memories!
Margaret
Monday, June 1, 2009
And Many Mower - TSSChallenge #72

Happy Monday to you! It's the day for Technostamper's Monday Sketch Challenge! On the right is our sketch for today which I like very much. Even so, I had to rotate it to accommodate the idea I had for using it. I'm sure I'll be using this sketch again!
Father's Day is coming up on June 21st! My son-in-law plays golf as does my brother so I have good use for this set. Not to mention the images of the set that I didn't use are a lawn mower and some others that can be used for birthdays or even retirement! It's a fun and versatile set and a good investment for cards for guys!
I rotated the sketch because the placement of the sentiment didn't work with this image and had to be moved. I began with a base card of Pacific Point cardstock then layered 1 1/2" wide strip of Muirfield Designer Paper. Even though this DSP was retired from last fall's catalog, I just couldn't resist using the plaid with the golfer. Then I added a 2 1/2" strip of Kiwi Kiss cardstock. The golfer was stamped in Staz-On (so the lines won't blur with the Blender Pen) onto Very Vanilla cardstock (there is Vanilla in the plaid). I colored him in with the Blender Pen and ink from the lids of my ink pads. There is a soft Going Gray shading around the image to ground it. This was layered on Pacific Point cs.
The sentiment was stamped and punched out with the Large Oval Punch then sponged with Kiwi Kiss and layered on a Key Tag Punch out of Pacific Point. This was adhered over the Pacific Point Striped Grosgrain Ribbon that covers the seam of the two papers.
The "golf balls" were made by running a scrap of Whisper White cardstock through the Big Shot with the Small Dots Texturz Plates then punching out three 1/2" circles. These were mounted with "wrong side out", with the dimples going in, for the golf balls, and then on additional circles of Pacific Point.
This was a fun and easy card to make and I enjoyed the sketch! And Many Mower is found in the current Occasions Mini Catalog which ends on June 30! You may see Technostamper's card here and also links to others who've posted their cards done with this sketch.
Stamps: And Many Mower
Father's Day is coming up on June 21st! My son-in-law plays golf as does my brother so I have good use for this set. Not to mention the images of the set that I didn't use are a lawn mower and some others that can be used for birthdays or even retirement! It's a fun and versatile set and a good investment for cards for guys!
I rotated the sketch because the placement of the sentiment didn't work with this image and had to be moved. I began with a base card of Pacific Point cardstock then layered 1 1/2" wide strip of Muirfield Designer Paper. Even though this DSP was retired from last fall's catalog, I just couldn't resist using the plaid with the golfer. Then I added a 2 1/2" strip of Kiwi Kiss cardstock. The golfer was stamped in Staz-On (so the lines won't blur with the Blender Pen) onto Very Vanilla cardstock (there is Vanilla in the plaid). I colored him in with the Blender Pen and ink from the lids of my ink pads. There is a soft Going Gray shading around the image to ground it. This was layered on Pacific Point cs.The sentiment was stamped and punched out with the Large Oval Punch then sponged with Kiwi Kiss and layered on a Key Tag Punch out of Pacific Point. This was adhered over the Pacific Point Striped Grosgrain Ribbon that covers the seam of the two papers.
The "golf balls" were made by running a scrap of Whisper White cardstock through the Big Shot with the Small Dots Texturz Plates then punching out three 1/2" circles. These were mounted with "wrong side out", with the dimples going in, for the golf balls, and then on additional circles of Pacific Point.
This was a fun and easy card to make and I enjoyed the sketch! And Many Mower is found in the current Occasions Mini Catalog which ends on June 30! You may see Technostamper's card here and also links to others who've posted their cards done with this sketch.
Stamps: And Many Mower
Ink: Kiwi Kiss, Pacific Point, Black Staz-On, Going Gray, Blush Blossom
Paper: Muirfield DSP (retired); Pacific Point (retiring), Kiwi Kiss (retiring), Very Vanilla, Whisper White card stocks
Accessories: 1/2" Circle Punch; Key Tag Punch (retiring), Large Oval Punch, Pacific Point Striped Grosgrain Ribbon (retiring), Big Shot, Small Dots Texturz Plate, Stampin' Sponge, White Signo Gel Pen.
The list of stamps and also the accessories that are being retired from this catalog were posted today on the Stampin' Up! website! Once these are gone, they are GONE, so please order those things that you want TODAY so you won't be disappointed! You may order online from my Stampin' Up! website 24/7. Just click here to go there. Some of the accessories are on sale for 25 to 50% off! Don't miss this fabulous bargain and great way to stretch your dollars!!
Hope you have a wonderful day and week! Thanks for visiting and come back soon.
Margaret
The list of stamps and also the accessories that are being retired from this catalog were posted today on the Stampin' Up! website! Once these are gone, they are GONE, so please order those things that you want TODAY so you won't be disappointed! You may order online from my Stampin' Up! website 24/7. Just click here to go there. Some of the accessories are on sale for 25 to 50% off! Don't miss this fabulous bargain and great way to stretch your dollars!!
Hope you have a wonderful day and week! Thanks for visiting and come back soon.
Margaret
Your comments are always encouraging and appreciated. Thanks!
Tuesday, May 26, 2009
Golden Oldies
One of the fun new sets in the Occasions Mini Catalog is Golden Oldies which consists of three stamps featuring seniors, each with a humorous saying included.
The Card Games set tied right in with the sentiment that says "shuffle" so I used the image of the king card and stamped it in Real Red on the Real Red background layer. It's hard to see in the picture but it's there! The Jackpot Designer Paper was layered onto black to make it pop and two of the card suit images were stamped in black on the upper left of that. The image of the fellow was colored with Blender Pen and ink from the lid of the ink pad then emphasized with markers and softened with the Blender Pen.
The template and pad from the Mat Pack were used to do the paper piercing on the corners with the Piercing Tool from the Crafters Tool Kit.
The sentiment was stamped on So Saffron cardstock, punched out with the Large Oval Punch and layered on Real Red punched out with the Key Tag Punch. Retired diamond-shape silver brads accent this layer which was added with Dimensionals to emphasize it.
On the inside of the card I stamped twice the four card suit images, inking the stamp with red and black markers.
Stamps: Golden Oldies, #113712, set of 3, $16.95; Card Games, #113202, set of , p. 109, $19.95
Inks: Real Red, So Saffron, Basic Black, Blush Blossom; Real Red Marker
Papers: Jackpot Designer Series Paper; So Saffron, Real Red, Basic Black, Whisper White
Accessories: Key Tag Punch, Large Oval Punch, Blender Pen, Black Gingham Ribbon, Mat Pack, Piercing Tool, Silver Brads (retired), Dimensionals.
Remember that the "Buy Three, Get One Free Sale" on ALL Designer Series Paper and 12 x 12 Textured Card Stock packs ends the last day of this month!! You don't want to miss this great special! You may go to my Stampin' Up! website HERE to order, or email me to place your order quickly!
Thanks for visiting today! Hope your day is filled with blessings and you get some time to stamp a little also!
Margaret
The Card Games set tied right in with the sentiment that says "shuffle" so I used the image of the king card and stamped it in Real Red on the Real Red background layer. It's hard to see in the picture but it's there! The Jackpot Designer Paper was layered onto black to make it pop and two of the card suit images were stamped in black on the upper left of that. The image of the fellow was colored with Blender Pen and ink from the lid of the ink pad then emphasized with markers and softened with the Blender Pen.The template and pad from the Mat Pack were used to do the paper piercing on the corners with the Piercing Tool from the Crafters Tool Kit.
The sentiment was stamped on So Saffron cardstock, punched out with the Large Oval Punch and layered on Real Red punched out with the Key Tag Punch. Retired diamond-shape silver brads accent this layer which was added with Dimensionals to emphasize it.
On the inside of the card I stamped twice the four card suit images, inking the stamp with red and black markers.
Stamps: Golden Oldies, #113712, set of 3, $16.95; Card Games, #113202, set of , p. 109, $19.95
Inks: Real Red, So Saffron, Basic Black, Blush Blossom; Real Red Marker
Papers: Jackpot Designer Series Paper; So Saffron, Real Red, Basic Black, Whisper White
Accessories: Key Tag Punch, Large Oval Punch, Blender Pen, Black Gingham Ribbon, Mat Pack, Piercing Tool, Silver Brads (retired), Dimensionals.
Remember that the "Buy Three, Get One Free Sale" on ALL Designer Series Paper and 12 x 12 Textured Card Stock packs ends the last day of this month!! You don't want to miss this great special! You may go to my Stampin' Up! website HERE to order, or email me to place your order quickly!
Thanks for visiting today! Hope your day is filled with blessings and you get some time to stamp a little also!
Margaret
Tuesday, April 28, 2009
A Huge Thank You! and Viola! Birthday!
A Huge THANKS to all who visited my blog yesterday on the SU Occasions Mini Blog Tour and especially if you posted a comment! That encourages me so much and I really appreciate it! We had an amazing turn-out! I enjoyed the opportunity to surf all the blogs on this tour and also the two others; we had around 55 blogs total participating! I hope you got to see a great many of them also!The winner of my blog candy is Charla Crawford! Thanks to all of you who left me a comment to register! I'll get it in the mail to Charla tomorrow.
ANNOUNCEMENT: We have another Blog Tour scheduled for May 15 so mark that date down on your calendar and come back here to begin! Woohoo!!
I'll be back later today to post but wanted to get these announcements up now!
******
This is one of the cards from my recent Stamp-A-Stack using the Viola! set (#115102, $25.95, p. 45). Isn't this chef just great fun?!
He was stamped with Staz-On then colored with Blender Pens and reinkers using Blush Blossom (skin) and Riding Hood Red (scarf and cuffs). The cake was colored with the Pink marker and Red reinker and Blender Pen. Just the pants part of the stamp was stamped on the check paper, then the pants cut out and adhered to the matching part of the stamped chef to give him those great checked pants. Watch out, Mario!! (Do you watch the Food Network?!)The cake was stamped on a scrap, colored, cut out then applied to the platter with Dimensionals. The candle flame was highlighted with glitter for some "fire"! : ) The greeting from the set was stamped on Kiwi Kiss then punched out with the Curly Label Punch and layered on another black punch for depth and emphasis, then attached with Dimensionals.
This set comes with three accessories to sit on the platter as well as two greetings. Viola To Go is an accessories set of six made specifically for the platter and could also be used in other ways too. A very fun and useful set! And great for a man-card also!
Stamps: Viola!
Inks: Staz-On Black, Basic Black, Bashful Blue, Blush Blossom, Riding Hood Red Classic Inks; Pretty in Pink Marker
Paper: Riding Hood Red, Kiwi Kiss, Whisper White, Basic Black card stocks; Bella Rose Designer Paper (check), Candy Lane Designer Paper (dots)
Accessories: Photo Corner Punch, Curly Label Punch, Paper Snips, Blender Pens, Dimensionals, 2-Way Glue Pen, Dazzling Diamonds Glitter.
Thanks for visiting again today! Come back soon!
Margaret
Sunday, April 26, 2009
Forest Friends and TSSC #67!
The set I'm featuring today is Forest Friends. The first time I saw them, I thought they were just so cute...they looked like Bambi and Thumper and friends! My first card is for Technostamper's Monday Sketch Challenge #67. Here is the sketch for today:I used the Forest Friends set as well as the Glad Friends single sentiment stamp. On page 208 of the catalog are all the
other single stamps that are available free as part of the current "Get Connected" promotion this month . It can also be received free when you purchase $40. or more in merchandise from the Occasions Mini Catalog on or before April 30 or host a workshop with sales of $150. or more.The Kiwi Kiss paper in the background is the Walk in the Park Designer Series Paper, also from the mini. This was layered on Baja Breeze then a Chocolate Chip 4 x 4" card. Baja Breeze grosgrain ribbon was added around the card and embellished with a punched out flower and a chocolate Flower Brad. The flowers on top of the sentiment were punched out with the Trio Flower Punch . This was all layered on a chocolate Scallop punch.
Be sure to go to Technostamper's blog from the link at the end of today's post to see her card for this challenge as well as a list of all the other players for this week.
*****
The second card is a bit more rustic with the Chocolate Chip and Creamy Caramel card and handstitching with natural Linen Thread. Using my Chocolate Chip inkpad, I gave the Caramel cardstock a faux woodgrain then ran it through the Big Shot machine with the Distressed Texturz Plate to really give it texture.The Sage Shadow layer was also given the woodgrain treatment, stamped lightly with Baja Breeze then handstiched to the chocolate layer. The owl and deer were stamped then cut out and adhered. Chocolate 5/16" brads were added at the two right corners. This would be a good card for a male, and sometimes I really run low on those!
*****
Third is a shadowbox card in a Kiwi Kiss, Baja Breeze and Chocolate Chip color scheme. The owl and deer were again stamped, cut out and laid aside. A circle was cut in the first layer (Urban Garden Designer Paper); the second layer (Sahara Sand cardstock) was stamped first with the tree in the set then partially cut out. The last layer is Baja Breeze which you can see in the center. The owl and deer were then adhered to their respective layer.The sentiment is from the fun Really Retro sayings, set of seven. It was punched out with the Word Window Punch, as were the two Chocolate Chip pieces on which it is layered. Vanilla 5/16" brads are not only decorative but hold all three layers together.
Don't forget the "Get Connected" Special this month for the free individual stamp. No Limit!
You may go to Technostamper's blog here.
Thanks for dropping by! Hope you will come back soon!
Margaret
Wednesday, April 22, 2009
Classic Sketches BC95
The challenge last Friday for the Blogger's Challenge was a color challenge: use Always Artichoke, Chocolate Chip, Sage Green and Sahara Sand to make your card. I was a little "iffy" the Sage with the Artichoke but I'm happy now with the way these went together.
For this card I used my new Classic Sketches set from the Spring-Summer Catalog. As I mentioned yesterday, I really like the Classic and Vintage styles so this was one of the first sets I ordered.
I paired the largest image from the set with a saying from the Sense of Time set I used yesterday. The image was stamped in Artichoke Craft Ink and embossed with Clear Embossing Powder, as was the sentiment. The card base is Chocolate Chip card stock. Overlaying that is a piece of Sage Shadow which has been rolled with the Baroque Border wheel and stamped with another stamp from the set, both in Sahara Sand ink.
The Ticket Corner Punch was used on many of the corners to give them a more ornate appearance. Chocolate Chip 5/8" grosgrain ribbon and Vintage Brads finish off the card.
Sets: Classic Sketches, #113206; Sense of Time, #113804; Baroque Border Wheel, #109675
Paper: Chocolate Chip, Always Artichoke, Sage Shadow, Sahara Sand
Inks: Chocolate Chip Craft and Classic; Always Artichoke Craft; Sahara Sand
Accessories: Standard Wheel Handle, Chocolate Chip 5/8" Grosgrain Ribbon; Vintage Brads, Ticket Corner Punch, Clear Embossing Powder
Click HERE or on the Bloggers Challenge logo in the left sidebar to see the list of Challengers, then visit some of them to see what they did with this challenge!
Hope you enjoy! Thanks for dropping by. Have fun stampin'!
Margaret
For this card I used my new Classic Sketches set from the Spring-Summer Catalog. As I mentioned yesterday, I really like the Classic and Vintage styles so this was one of the first sets I ordered.I paired the largest image from the set with a saying from the Sense of Time set I used yesterday. The image was stamped in Artichoke Craft Ink and embossed with Clear Embossing Powder, as was the sentiment. The card base is Chocolate Chip card stock. Overlaying that is a piece of Sage Shadow which has been rolled with the Baroque Border wheel and stamped with another stamp from the set, both in Sahara Sand ink.
The Ticket Corner Punch was used on many of the corners to give them a more ornate appearance. Chocolate Chip 5/8" grosgrain ribbon and Vintage Brads finish off the card.
Sets: Classic Sketches, #113206; Sense of Time, #113804; Baroque Border Wheel, #109675
Paper: Chocolate Chip, Always Artichoke, Sage Shadow, Sahara Sand
Inks: Chocolate Chip Craft and Classic; Always Artichoke Craft; Sahara Sand
Accessories: Standard Wheel Handle, Chocolate Chip 5/8" Grosgrain Ribbon; Vintage Brads, Ticket Corner Punch, Clear Embossing Powder
Click HERE or on the Bloggers Challenge logo in the left sidebar to see the list of Challengers, then visit some of them to see what they did with this challenge!
Hope you enjoy! Thanks for dropping by. Have fun stampin'!
Margaret
Subscribe to:
Posts (Atom)


