Showing posts with label Easter. Show all posts

Wednesday, February 22, 2012

Mixed Bunch in Wisteria and Concord

It seems that the Mixed Bunch stamp set with coordinating Blossom Punch is one of the most popular stamp sets in the Occasions Mini Catalog!   And with good reason!!  I'm definitely reeled in by coordinating stamps and punches myself, lol!!  This card is a sample I created to show at my workshops this month as we use this set and punch for our Make and Take card (which will be posted at a later date).  
The color scheme is Wisteria Wonder, Concord Crush and Whisper White with some Daffodil Delight added.  I used the daisy-like stamp and one of the flower centers (there are three of each in the set); the yellow flower was stamped on a yellow print paper from the Attic Boutique Designer Paper package then punched.  The Wisteria (lighter) flower was stamped with Concord Crush and the Concord Crush flower was stamped with Whisper White CRAFT Ink then punched.  The centers were punched out and layered over the largest flower punched with the BoHo Blossoms punch.  Aren't all these punches wonderful how they can layer together to make different looks!!  I love my punches!!
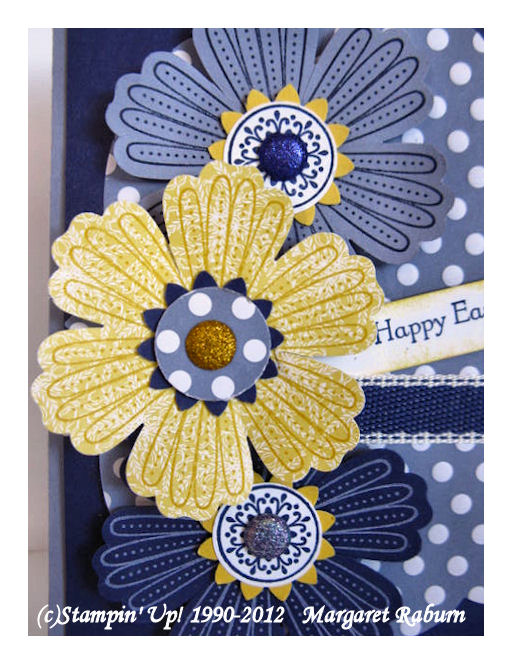
Here you can see a close-up of the flowers; Glimmer Brads were used in the center of each.
The Wisteria Wonder polka dot is from the Sweet Shop Specialty Paper package; not only is it cardstock weight, each white dot is embossed too!  It's NICE!  It is die cut with one of the larger Label Framelits then adhered to the Concord Crush background.  A swath of Concord Crush 1/2" Stitched Poly Ribbon wraps these together.  The card base is Wisteria Wonder
The "Happy Easter" greeting is from the Teeny Tiny Wishes set (one of my go-to word sets!)  It is stamped on white then cut in a small banner and the edges are sponged with Daffodil Delight ink.  On the inside you'll see a narrow strip of the polka dot DSP added to carry the design through.

Stampin' Up is celebrating Sale-A-Bration and all orders of $50. or more in merchandise earn you a free bonus product from the Sale-A-Bration brochure!  You may contact me to order or place your order through my secure Stampin' Up! website here!

Thanks for visiting today!  I hope you enjoyed my card and will have some time to stamp soon yourself!

Margaret


Thursday, March 10, 2011

Easter Blossoms

I was glad to receive two swap cards recently featuring the Easter Blossoms set; it is such a gorgeous set  I want to share them with you today; I haven't had the opportunity to stamp the last few days as I am working on getting my taxes ready to turn in, deadline tomorrow, so this will be short and sweet then back to work.
The first card by Nancy Thompson uses Naturals Ivory Cardstock which I really like but don't use often enough.  The accents are Real Red Cardstock and Taffeta Ribbon.

Made by Pam Jones-Litchenburg, this card is made with a Pretty in Pink and Early Espresso color scheme.  The tiny butterflies cut and embossed with the Beautiful Wings Embosslit are a lovely finishing touch.

Thanks for visiting!  I hope you enjoy these two swaps like I have, and a big thanks to Nancy and Pam for sharing their artwork with us!

Margaret

Saturday, March 5, 2011

Big Shot Bunny Basket

Whoa!  It's March already and Easter will be coming up before I know it!  I just love things made with my Big Shot so when I saw a bunny basket on a blog, I just knew I had to make a version of my own!

The basket portion is actually a white box cut with the Fancy Favor Bigz XL Die.  The bunny front and back are cut with the large Scallop Circle die, ears with the Wide Oval Punch and Large Oval Punch and feet also with a Wide Oval Punch.  The cheeks are 1" Circle Punches, eyes 3/4" and 1/2" Circle Punches and nose is the Heart Small Punch.  (All the punches are on pages 200 to 203 in the Idea Book and Catalog).  Thin white cardstock slivers cut with the SU Tabletop Trimmer are used for whiskers.
 
 All the white cardstock pieces were sponged on the edges with Pretty in Pink ink except the eyeballs, which I sponged in Bashful Blue.  The handle was punched out of Pretty in Pink cardstock with the Dotted Scallop Ribbon Border and adhered with Snail adhesive and 5/16" White Jumbo Brads.  On the back I added a white tissue "puff" made with a flower punch and mini brad for a little cottontail.  (oops, no picture!)
The white highlights on the eyes were done with the Signo White Gel Pen, the mouth with the Early Espresso Stampiin' Write Marker and her paws marked with the Crumb Cake Stampin' Write Marker.  The little pink bow was laying on my stamping desk, being made but unused from a previous project, so I just stuck it on her ear at the last minute for fun.  : )

This box is quite roomy at 2-1/4" deep, 3" wide and 3-1/2" tall so it will hold a nice gift or treats!  I already know a little girl who will love this one!  Now to fill it will something other than just paper shreds...

All products Stampin' Up! and can be ordered through my SU website store or by contacting me personally.

Thanks to Chris Galbraith who inspired me with a bunny basket on her blog.
Thanks for visiting today!  Hope you enjoy your weekend!  We had nice sunshine today which was so warming even though the wind was still a bit chilly!

Margaret

Friday, March 4, 2011

Lucky Shamrock!

Our holiday for the month of March is St. Patrick's Day, so if you celebrate it, have friends who do or you just enjoy the festivities, it's time to start playing with your shamrock stamps and greens!  (not your food, your stamp greens! lol! sorry!)
You'll find this Lucky Shamrock stamp on the inside back page of the current Occasions 2011 Mini Catalog!  Quite the bargain at only $6.95 (#121939) and it also coordinates with Stampin' Up!'s 1-3/4" Circle Punch, which means no tedious cutting trying to get a decent circle around the image!  Gotta' love those handy punches!

Garden Green cardstock, ink and Designer Series Paper (from Patterns Pack II, a retired Hostess pack; these come in so handy!) and the Textured Impressions Framed Tulips Embossing Folder are the basics of this card.  I also used sketch #140 from the Create with Connie and Mary blog (a fun sketch, too!) and the colors from the holiday and the Stampin' Celebrations weekly challenge blog.
Above is a close-up of the focal image of the card, the Lucky Shamrock image.  I've layered it over a Scallop Circle flower, which I made using two Designer Paper punchouts using the 2-3/8" Scallop Circle Punch.  The center of the image is highlighted with a Rhinestone which I colored with a green Sharpie marker (It's so cool to be able to color these sparkly clear SU Rhinestones to coordinate with the colors I use!).  I also added some more bling with Dazzling Diamonds Glitter and 2-Way Glue Pen.
I finished the inside of my card with a strip of the Designer Paper and a shamrock stamp from the Got Treats set and "happy St. Patrick's Day" from Teeny Tiny Wishes

Thanks for visiting today!  Have a great weekend!

Margaret

Edited to add on 3-10-11:  I'm thrilled that this card was selected by Create with Connie and Mary for their Top Three Picks for this challenge, and also by Stampin Celebrations Weekly Challenge #42 for the top card (to be announced later!)!  Talk about Lucky Shamrock... I guess it really is!!  Thank you so much to both challenge blogs for picking my shamrock!  : )

Thursday, April 1, 2010

Easter Bear from Build-A-Bear

This past week I just happened on the Charlie Brown Easter special (which I saw years ago) entitled "Charlie Brown and the Easter Beagle."  Well, today we have the Easter Bear!  lol!  I made this Easter card for a little three-year-old girl.   She loved the birthday Build-A-Bear card I made her a few months ago so I thought she might enjoy a bear Easter card also!  I used lots of happy spring colors, some of which were scraps on my stampin' desk, like the punched flowers!

The bear is cut from Close to Cocoa cardstock and the clothes and shoes from the tiny patterns of Pawsitively Prints Designer Paper.   The rabbit headpiece, basket and eggs are cut with the Stampin' Up! Beary Hoppy Sizzlits Die.  Isn't that headpiece a hoot?!! 

The card base is Brocade Blue with a layer of Bashful Blue on top.  I swirled some White Craft Ink on the upper part of the Bashful Blue with a Sponge Dauber and it looks like very soft clouds, although it's not very visible in the photo.  Then a strip of Certainly Celery Designer Paper was fringed for grass and attached to the bottom.  On this are flowers punched with the Trio Flower Punch from various cardstocks and DSP.  Stems were drawn with the Certainly Celery Stampin' Write Marker.

117977  Build-A-Bear Die
117978  Stampin' Up! Beary Essentials
117982  Stampin' Up! Bear Girl Sizzlit Die
117327  Stampin' Up! Beary Hoppy Sizzlits Die
118060  Pawsitively Prints Designer Paper
109183  Trio Flower Punch
101731  Whisper White Craft Pad
105106  Certainly Celery Stampin' Write Marker

You may purchase any or all of these products on my Stampin' Up! demonstrator web site by just clicking HERE and clicking on the "Shop Now" in the upper right-hand corner.  Thanks!

Today is Blogger's Challenge Friday and our challenge this week is Easter.  You can click HERE to see what the other talented stampers in the group have made and posted to their blogs for BC Friday.

Thanks for dropping by for a visit!  I love it when you stop and say hello!

Margaret

Saturday, March 13, 2010

Easter Chocolate Bunny!

That little chocolate bunny you used to find in your Easter basket is now a rubber stamp!  How fun is that?!  It isn't part of a set but a single stamp and inexpensive to boot!  The Chocolate Bunny stamp is found in the Occasions Mini Catalog with the "a la carte" stamps on the very last page, 43. You NEED this stamp...I did!  lol!


Laura Lipe and I did a one-on-one Easter/Spring swap.  This is Laura's adorable card; she used the Chocolate Bunny stamp on Close to Cocoa in Chocolate Chip ink then cut it out and adhered to  Whisper White; this was then layered on Old Olive. 

Laura used the Cottage Wall Designer Paper layered on Old Olive on two panels, making an interesting layout.  The card base is Orchid Opulence cardstock.

The "Happy Easter" is from the beautiful Well Scripted stamp set (eight stamps) from the Occasions Mini Catalog.  It is stamped in Rich Razzleberry and punched out with the Designer Label PunchRich Razzleberry punched with the Curly Label Punch is layered behind the sentiment for depth and contrast.

Thanks, Laura, for a fun swap!!  You've inspired me to get my Chocolate Bunny stamp out and use it some more.  It is just so yummy!  lol!!

You can find the card I sent to Laura here and her blog here.

Thanks for visiting today!  Have a great weekend!

Margaret

Saturday, February 20, 2010

Abundant Hope Easter Card

Even though it is still cold, I welcome the days when the temperature is a little warmer and the sun is shining.  I'm looking for signs of spring, and one of those signs would be the shoots of green from bulbs like crocus and daffodils.  Like Easter, these welcome green shoots are symbols of new life to come!


I trimmed off the first two design rows of my Finial Press Embossing Folder and used that with the Big Shot to dry emboss the open edge of the Certainly Celery card. 

The daffodils were stamped with Basic Black onto Whisper White cardstock.  Color was added with Stampin' Write Markers in Certainly Celery and Apricot Appeal, So Saffron, Blender Pens and the So Saffron ink pad.  The horizontal flourish was stamped in Orchid Opulence

Underneath the image is a layer of Orchid Opulence cardstock which has the Easter greeting subtly stamped with Orchid Opulence.  A tie of Apricot Appeal Grosgrain Ribbon encircles this before it is adhered to the celery card front.

Stamps:  Abundant Hope, #117054 wood, $17.95; #118547 clear mount, $13.95.
Ink:  Orchid Opulence, So Saffron.
Markers:  So Saffron, Apricot Appeal, Certainly Celery
Paper:  Certainly Celery, Orchid Opulence Whisper White card stock
Accessories:  Blender Pen, Apricot Appeal 1/4" grosgrain ribbon, Big Shot, Finial Press Embossing Folder, Scallop Edge Punch

Thanks for visiting today!  I hope spring soon breaks through winter for all of us who've been in winter mode!  Have a great weekend!

Margaret

Thursday, April 2, 2009

More Easter Bunny Cards with Eight Great Greetings

For my workshop this past weekend we did a little 4" x 4" card with the cute little bunny from the brand-new set Eight Great Greetings from the Occasions Mini Catalog (April 1-June June 30, 2009). This is a good size card to use for smaller size images and also when you want to tuck a small card into a gift, basket or even use as a gift tag.

The bunny was stamped on Whisper White in Basic Black, colored with Stampin' Write Markers and Blender Pens then punched out with the 1 3/4" Circle Punch. It was then layered on the Scallop Circle from the Sizzix Pennant Die (these are larger circles than the Scallop Circle Punch). A piece of Designer Paper was added to the lower half of the card, the sentiment stamped and a ribbon tie added. A strip of colored cardstock was scalloped with the Scallop Border Punch and added to the inside bottom of the card to add some color there too. Viola! Done! Very quick and easy! A perfect little note to tuck into an Easter basket!

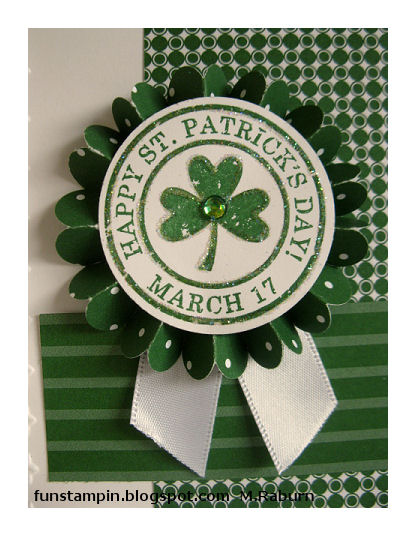
The Almost Amethyst Scallop card uses the delicate stripe from the Afternoon Tea DSP and the sublime Certainly Celery polytwill ribbon that was a free Sale-A-Bration selection with purchase. I hope you got some of it because it has the most amazing feel and is very easy to work with. Can you tell I love it? lol!

The Saffron Scallop bunny card uses the Saffron print Designer Paper from the Delicate Dots Sale-A-Bration DSP and the the Saffron Striped 5/8" grosgrain ribbon from the Spring/Summer Catalog. A card I saw made by Angie Juda gave me the inspiration for these cards.

This versatile set, Eight Great Greetings (#113822, set of 8, $27.95), has eight stamps with sentiment included that would be perfect not only for standard cards but especially for the smaller size cards, whether square or rectangle. The greetings cover birthday, Easter, thanks, Dad, wedding, congrats, shower and a humorous one that could also be used for Mother's Day. That's a lot of occasions!

Thanks for dropping in to visit! Hope you have a great day and you get some time to have fun stampin'!

Margaret

Thursday, March 26, 2009

Sneak Peek: Eight Great Greetings!

One of the sets available in the upcoming Occasions Mini Catalog Sneak Peek is this versatile all-occasion set, Eight Great Greetings! I used this week's sketch challenge from Mojo Monday and the cute little bunny from this set to make a Happy Easter card.

I stamped the image and colored with markers and blender pen. The pink background was embossed with the Large Dot Texturz Plate and the Big Shot. The stripe paper is from the Afternoon Tea Designer Paper pack and is layered on Amethyst. The wonderful Certainly Celery polytwill ribbbon finishes it off; it has such a nice smooth feel and is great to work with.

Stamps: Eight Great Greetings
Inks: Basic Gray pad; So Saffron, Pretty in Pink, Certainly Celery, Almost Amethyst Markers
Paper: Afternoon Tea Designer; Basic Gray, Pink Pirouette, Almost Amethyst, Whisper White, Certainly Celery card stock
Accessories: Celery Polytwill ribbon (SAB), Blender Pen, Eyelet Border Punch, 1/4" circle punch, Big Shot, Large Dot Texturz Plate

For some reason my photo is rather muted but the colors look good IRL; so sorry. I really like this sketch and think I'll be using it again in the future!

Thanks for dropping by! Have fun stampin'!

Margaret

Sunday, March 23, 2008

Glorious Gift!

Happy Easter!!


Jesus is Risen, is alive forever and He loves You!
May you accept God's everlasting love through Jesus which will bring you eternal life and joy.
John 3:16, The Bible

Wednesday, March 19, 2008

A Card for Easter


Illuminations is a beautifully ornate set of four large stamps. Each has a lovely expression in the center of the scrollwork: Hope, Thanks, Cherish and Joy. Think of all the occasions for which these could be used, everything from weddings, to Christmas and many others in between! You won't find this set in the Spring-Summer Catalog but it is available. It is currently on the Dormant list, which means it can be ordered even though not in the catalog. I have been eye-ing it for quite some time; I just recently purchased it and am so glad I did! It's very elegant!

The Baroque Border standard wheel in Lavender Lace forms the borders for the card. By embossing the image, I was able to sponge on several colors of ink to highlight it. The edges were distressed using the Cutter Kit and a circle Fire Rhinestone brad accents the torn corner. Lucious Mellow Moss Taffeta ribbon is the finishing touch.

Set: Illuminations, Baroque Border wheel
Cardstock: Lavender Lace, So Saffron, Mellow Moss, Whisper White
Ink: Lavender Lace, So Saffron, Mellow Moss, Whisper White Craft, Lavender Lace cartridge
Accessories: Fire Rhinestone brad, Mellow Moss Taffeta ribbon, Cutter Kit, Standard wheel handle, white embossing powder.

If you wish any more information on this set (price, etc., or to order) please contact me.

Happy Wednesday, everyone. Thanks for dropping by!

Wednesday, March 21, 2007

Glorious Gift!

Glorious Gift! That's the name of this set from the Spring Mini Catalog that is perfect for Easter greetings! I love the "handwriting" font in which this verse from the set is written.

Stampin' Up!™ colors used are Certainly Celery, Apricot Appeal, Pink Passion and a touch of Lovely Lilac. Watercolor paper was used for the central image. It was spritzed with water before stamping, stamped, allowed to dry and then overstamped with the same image in the same color. The word stamp was then stamped in Basic Black over all.

The full card base of Apricot Appeal was stamped with Fine Lace background in Apricot Appeal then layered over a single layer of Certainly Celery; that's why in the picture the border looks uneven at the upper right and on the open side. I used the tag punch on the top two layers then added Apricot brads from the Soft Subtles assortment to each corner. The Horizontal Slit Punch was used on each side of the Apricot front to make a "notch" for the ribbon; this also allowed the narrow white organdy ribbon to go through the fold of the card and around the back, coming up the other side. The loop of ribbon in the lower front is not connected to the card. ☺

Have a wonderful day! Easter Celebration is only two and a half weeks away!
Related Posts Plugin for WordPress, Blogger...