Showing posts with label Die cuts. Show all posts

Wednesday, November 26, 2014

Grateful for You times Two!

Happy Day before Thanksgiving!  I have my last fall creations to share today:  a card and a Curvy Keepsake box all decorated for sharing your gratitude! 


Stamps:  Merry Everything (Grateful for You - Tag), For All Things (leaf and oval grateful sentiment)
Inks:  Soft Suede, Blackberry Bliss
Paper:  Crumb Cake, Mossy Meadow, Blackberry Bliss, Tangelo Twist, Gold Glimmer Paper
Accessories:  Autumn Accents die (diecuts), Burlap Ribbon, Note Tag Punch, Curvy Keepsake Box Thinlit, Big Shot, Woodgrain Embossing Folder, Large Oval Punch, Dimensionals, Glue Dots.

Thanks for dropping by today!  I want you to know that I am very thankful for your visits, comments and encouragement as we share our enjoyment of stamping and papercrafting!

Have a lovely holiday!
 

Margaret

Thursday, March 6, 2014

A Million and One Thanks!

Today we have a super and simple sketch from Create with Connie and Mary!  I love that it's adaptable to so many ideas and quick to make! I'm thinking (praying and hoping) for Spring to come soon!


I used the beautiful script from the A Million and One stamp set on the open space of the sketch.  I stamped it with VersaMark and heat embossed it with White Embossing Powder onto the grid-like paper from the Retro Fresh DSP.   Next I layered this onto Strawberry Slush cardstock then onto a Whisper White card base.


I diecut four of the medium daisy-like flowers from Whisper White using the Blossom Party Die, shaped the petals with a bone folder, attached them in pairs and adhered them to the Strawberry Slush banner.  Lastly I centered each flower with small clay flowers that I colored with my AquaPainter and Daffodil Delight ink.  Did you notice the difference in these two pictures?  The first card doesn't have the Pearls I has planned to put on it.  After I posted the picture for the challenge, I realized that so I added them and took this picture!  So you get two versions today. : )

Stamps:  A Million and One
Ink:  VersaMark
Paper:  InColor 2013-15 Designer Paper Stack (Strawberry Slush); Retro Fresh Designer Paper.  Strawberry Slush, Wild Wasabi and Whisper White cardstocks.
Tools:  Big Shot, Blossom Party die, Little Leaves Sizzlet, Bone Folder and Heat Tool
Accessories:  White Embossing Powder,   Simply Pressed Clay and Flower Molds, Pearls.

Here is sketch CCMC293 from Create with Connie and Mary this week: 

Check out the creations of the other Challenge Team member at the Create with Connie and Mary blog!  They will inspire you! (they always inspire me!)

See how simple this challenge is?

Now it's your turn to take the challenge and make a card!  Just upload it to your blog or public location on the web then go to the CCMC website and link it to the challenge!  It's so easy to do and we'd love to see what you make!

Thanks for visiting today!  I always enjoy hearing from my stamping friends and appreciate your comments!

Margaret

Tuesday, June 11, 2013

Memorable Moments Anniversary

Last week I went to a reunion of my mother's family in Ruidoso, NM.  One of her cousins and wife was celebrating their sixtieth wedding anniversary with a dinner at the reunion so I wanted to make a special card for them!  Memorable Moments was just the perfect set for this because it can be personalized for any specific occasion!

I used Stampin' Up!'s beautiful Shimmer White cardstock for this project because of its lovely rich sheen; since the 60th Anniversary is traditionally the Diamond Anniversary, I added Silver Glimmer Paper for its brilliant diamond-like sparkle!


Popped up on Dimensionals over the card front is another layer of Shimmer White cardstock that has been dry embossed with the Lacy Brocade Embossing Folder, which is retired I know, but my new Beautiful Baroque Embossing Folder hadn't arrived when I made this card.  Either would work equally well!  At this point, I gave this layer a good misting with the Vanilla Shimmer Mist;  it really has a pearly sheen which you can kind of see in the first picture where the light is hitting it!


I used my Big Shot and the Lattice Die to cut a lattice from the Shimmer White cardstock and then attached it with Dimensionals for added emphasis.  Medium size Rhinestones were used to embellish, another representation of the diamond anniversary.   The "6" and "0" from the set were stamped with VersaMark, heat embossed with Silver Embossing Powder then diecut with a Label Framelit.  Behind that is a Silver Glimmer Paper diecut with a larger Label Framelit from the set.

I wish you could see this in person as it is really much prettier and oh, SO sparkly!  My photography doesn't help, lol!  The "Happy Anniversary" was stamped inside, along with my handwritten congratulations.  : )

This is such a versatile set!  It has all the digits and you can combine them for any number to celebrate birthdays, anniversaries or other milestones of life!  I'm going to get lots of use from this!


Memorable Moments stamp set    #132039wood  $29.95;    #126682 clear   $21.95

Lattice Stampin' Up! Bigz Die     #115958     $21.95

All of these products can be purchased online through my Stampin' Up! website here.  And while you're there check out the Clearance Rack for reduced price treasures (these can only be ordered through online customer orders).  Thanks!

Happy day to you!

Margaret

Thursday, May 2, 2013

To Die For Color Challenge CCM250

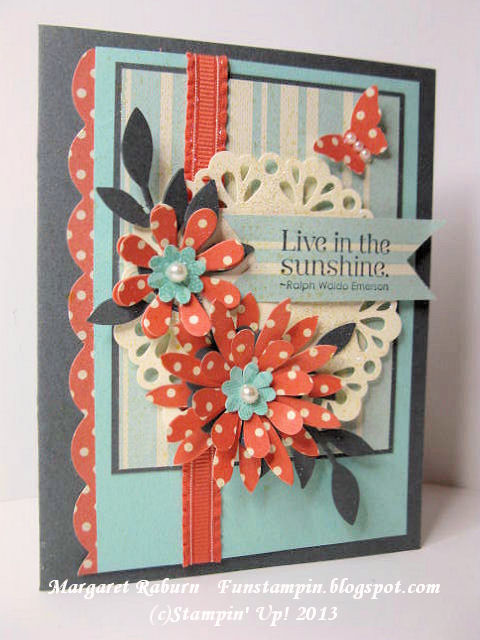
Well, Big Shot dies, really ... I used two different dies on this card for today's Create with Connie and Mary Thursday Challenge, as well as two Sizzlets!   The challenge colors are Pool Party,  Calypso Coral and Basic Gray, and here's my card:


This is a fun color challenge using two of my favorite colors:  Pool Party and Calypso Coral!  I'm so glad they are returning to the Stampin' Up! color line-up as standard colors instead of being retired!  The Basic Gray provides good contrast for these light and bright colors!


I used the Blossom Party Originals Die and polka dot Tea for Two Designer Series Paper for the flowers  and Boho Blossoms Punch for the small Pool Party centers.  The leaves are cut with the Little Leaves Sizzlet, which is a a must-have for me!  The doily was diecut with the Large Delicate Doilies Sizzlet; the polka-dot scallops were diecut with the Tasteful Trim BigzXL Die.  The little polka-dot butterfly was punched with the Bitty Butterfly Punch


The Comfort Cafe Designer Series Paper is the source for the striped Pool Party dsp and the greeting is from the retiring Pursuit of Happiness set; I've really used this set a lot and will miss it!   I love the flowers that are made with this Blossom Party Originals Die; I need to use this more!  Basic Pearls center both the flowers and butterfly.

Thanks for visiting today and I appreciate your comments.  Try this super color combination for a card yourself, post it somewhere online then add your card link to the challenge post at Create with Connie and Mary CCM250!

Have a stampin' good day!

Margaret

Wednesday, September 26, 2012

"AUTUMN" Garland

Life has been busy around here with home improvement and repair (from hail and storm damage) plus some home decor and cleaning!  Whew!  I'd rather be stamping!!  lol!  But it is always really nice to get some things checked off the to-do list!

I did get to spend some time in my stamp room since part of my home decorating included making a little garland celebrating the first of autumn last weekend.  I love to make and decorate with garlands and banners and my Big Shot makes it so much quicker and better too!  No fussy cutting on these babies; it's all done with dies! 

First I'll show you the pictures and then I'll list what I used to make this wreath that I hung on the light fixture/pot rack over the island in my kitchen:


This photo is of the garland strung onto the fixture, but it was difficult to get a very good photo: 
At any rate, it hung nicely between the lights and there were six spaces, so it was just the perfect number for an "AUTUMN" garland!

Main products used for the garland, all from Stampin' Up!:
Bigz Typeset Alphabet Dies, #127553
Big Shot Die Cutting Machine  #113439
Bigz XL Pennant Die (retired, but it was just the perfect size so I just had to use it!)
*Bigz Die Autumn Accents #127812
Vintage Wallpaper Folder #120175
Scallop Edge Border Punch $119882
*Champagne Glimmer Paper #127885
Comfort Cafe Designer Series Paper #126898
Cardstocks:  Early Espresso, Cajun Craze, Summer Starfruit, Lucky Limeade, Midnight Muse, More Mustard
Small Flower Buttons from the Regals, Neutrals, Brights Designer Buttons Collections
Gold Glow Smooch Spritz  #118770

*Holiday Catalog 2012

I love the new Typeset Alphabet!  It was just the right size for this banner but it also works nicely on cards and many other type projects!

Thanks for visiting today!  I will be back in a day or two with more projects!

Happy Stamping!

Margaret

Tuesday, August 14, 2012

Scentsational Season Mug CCMC213

SO many wonderful new items in the Stampin' Up! Holiday Catalog!  Every time I look I see something else I "need", lol!  But one of the first "had-to-have" new products for me was the Scentsational Season stamp set with wonderful Christmas icons such as a gingerbread man, steaming coffee or tea mug, Christmas tree and a candy cane!  Of course, I also "had" to have the coordinating Holiday Collection Framelits (#127814) which makes cutting all the images out an absolute snap!!
The mug is stamped with the new In Color Gumball Green!  Love it for Christmas and beyond!  The steam is also from the same set, stamped lightly in Basic Grey and then embellished with Dazzling Details for sparkle;  it was also diecut with the matching Framelit.
The mug was adhered with Dimensionals to a Very Vanilla Label Framelit which was pierced with the template from the new Festive Paper Piercing Pack (#127857, also from the Holiday catalog!)   To the underneath left of the mug is a strip of Gumball Green cardstock which has been embossed with one of the Delicate Designs border Embossing Folder. 
I used three patterns from the Festival of Prints Designer Series Paper Pack.  I was so happy when I saw this in the Holiday Catalog because it offers 48 sheets, four each of twelve double-sided designs!  The size of the pad is 4-1/2" x 6-1/2", just a great size for cards or used for mounting photos on scrapbook pages.  And many of the prints can be used not only for Christmas but year-round!  At only $6.95, it's a great deal!  The cardfront is Cherry Cobbler cardstock.

 Scentsational Season Stamp Set   #121026 (w),  #121190 (c)
 Holiday Collection Framelits   #127814

These items are offered separately or as a combination bundle in the Holiday Catalog; by purchasing them together as a "bundle" you will save 15%!   That's always great news!!

You can purchase these and/or any other Stampin' Up! products from my secure online Stampin' Up! store HERE using Mastercard, Discover or Visa, and they will be shipped directly to your door from Stampin' Up!

Thanks for visiting my blog!  I always appreciate your time and thoughtfulness to leave a comment... it lets me know for sure that someone is reading this!  lol!!

Have a great day!

Margaret

Saturday, August 11, 2012

Birthday Reason to Smile

Oops, I found that I didn't get this card posted during July when this Reason to Smile stamp set was available for purchase!  However, since so many people have it now, I thought I would post the card anyway, and the idea could easily be used with a different stamp.

The card is 4-3/8" square Whisper White cardstock diecut with the Big Shot and the Scallop Square Bigz Die.  Before cutting, I folded the white and placed the fold just below the top scallops of the die to keep from cutting it.  
Next is a layer of Tangerine Tango cardstock overlaid with a square of Daffodil Delight Polka Dot Parade Designer Series Paper, one of my very favorites from this catalog (of course, I like them ALL but this was the very first on my list of must-haves!!)  
I diecut the medium doily on the Delicate Doilies Sizzle from Tempting Turquoise cardstock.  Next is the stamped image  (Two Step Stamping:  background flower in Daffodil Delight then the lines stamp in Tangerine Tango.)  I used Whisper White Baker's Twine tied through a Daffodil Delight button from the Bold Brights Collection.  Lastly is the sentiment stamped with "happy birthday" from the Itty Bitty Banners set and diecut with the coordinating Bitty Banners Framelit.  Having all these wonderful Big Shot and die tools make projects so much faster and yet have so much detail, and so easy!!

Note:  Even though this is a square card, it WILL fit into the standard A2 envelope for mailing or giving

You can purchase these and/or any other Stampin' Up! products from my secure online Stampin' Up! store HERE using Mastercard, Discover or Visa, and they will be shipped directly to your door from Stampin' Up!

Have a lovely weekend, and I hope you have a chance to stamp!  (It's good therapy, you know!!)

Margaret
Polka Dot Parade Designer Series Paper      #106902      $10.95 

Tuesday, July 3, 2012

Elegant Butterfly Card

I'm really enjoying the new Elegant Butterfly Punch (which coordinates with the Papillon Potpourri set) in the new Stampin' Up! Catalog!  I just love the realistic detailed shape and ease of use!  The only stamping on this card is just the butterfly antennae and the greeting!
I simply punched six butterflies, two of each of the Designer Series Papers that I chose from the Summer Smooches Collection; the colors of the butterflies are Tangerine Tango, Real Red and Rich Razzleberry.  I die cut Whisper White with the largest of the Apothecary Accents Framelits then die cut a second one from Rich Razzleberry.  
Using the new Essentials Paper -Piercing Pack and my new Stampin' Pierce Mat underneath, I paper-pierced the Whisper White die cut with the coordinating template to punch up the design!  The greeting was stamped with Basic Black ink using the "here's to you" stamp from the fun Friendly Phrases set.
The punched butterflies were added in two stages; the first butterfly was adhered firmly to the die cut with Snail Adhesive then the antennae was stamped.  Next the second butterfly was added with Glue Dots just in the very center.  This allows the wings to be bent up adding nice dimension.  I added three tiny Pearls for the "body" of the butterfly plus a string of five along the lower center of the die cut.
The card base is Tangerine Tango, overlaid with Whisper White which has been dry embossed with the beautiful new Fancy Fan Embossing Folder!  (Love this!!)  A strip of the new 3/8" Stitched Grosgrain Ribbon in Real Red encircles the white layer.  Over this is the die cut, which has been adhered to a second die cut of Rich Razzleberry (it was split in the center vertically in order to extend beyond both ends of the white).

I hope you've enjoyed the card.  It was really fun to make; I just love using all these fun products!  If you would like to order any of these, please visit my online Stampin' Up! website and click on the "Shop Now" button to access the store and order.  I thank you!

I appreciate your visit and hope you will come back by soon!

Have a Happy July 4th tomorrow!  God Bless America!

Margaret

Wednesday, June 20, 2012

"Heartfelt" in Melon and Gray

Two of the great new coordinating products in the 2012 Catalog are the Layered Labels stamp set (#127072 [c] and #127070) and the Apothecary Accents Framelits (#127003)!  Once you've stamped your label image in the set, then you diecut it with your Big Shot and matching Framelit!  Easy-peasy to get custom-looking diecuts for big impact!  In fact, with all the swirls in the stamp and Framelit and the lace border at the bottom, my card will work for the Fancy Frills challenge this week at the SUO Challenge blog.

 
Black, white and gray with a splash of bright color make such an eye-catching combination!  Here I've paired a Whisper White card, a layer of Basic Black then an overlay of a Basic Gray print paper from the Twitterpated Designer Series Paper Collection (#125406).  I added a happy splash of Melon Mambo for the center label overlay and for the trim along the bottom edge.

The focal image was stamped with the "Heartfelt" label, the largest image in the set of four.  I stamped it again on a smaller piece of Melon Mambo and cut out the oval shape then layered it over the white layer.  I then stamped another image on a Whisper White scrap and diecut that with one of the Bitty Banners Framelits (#129267) and layered it on top.  I added color to the greeting with my Melon Mambo Stampin' Write Marker and two small Basic Pearls to the Melon layer as well as four more on the large label for accent.

The decorative trim on the bottom of the designer paper was cut from Melon Mambo cardstock with one of the NEW Finishing Touches Edgelits (#127010)!  It was so easy!  I love those; they make beautiful edges so easy and quick to achieve and add miles of style!

I hope you've enjoyed the card today.  You can order any or all of these Stampin' Up! products using my secure online SU website HERE.  If you wish to contact me, please do so through my SU website HERE Thank you!

Thanks for dropping by!  Please know that I always appreciate you taking the time to leave a comment! 

Happy Stamping!

Margaret

Saturday, January 7, 2012

Sale-A-Bration Sneak Peek!!

Sale-A-Bration is just a little over two weeks away!!  YAY!!  It's the time of year when we get free quality Stampin' Up! products with a minimum purchase of $50. or more in Stampin' Up! products!  This can be an order online, at a stampin' party, class or individual order through your demonstrator!!

My card today is made with the beautiful Everyday Enchantment Designer Series Paper (12 sheets, 2 ea. of 6 double-sided designs; 12"x12", an S-A-B bonus product ) and a couple of stamps from the S-A-B Fresh Viintage stamp set, (set of 5, wood or clear mount) another bonus product available only during Sale-A-Bration!

Isn't this paper just gorgeous!!  It's the same weight and quality as the Designer Papers in the Stampin' Up! Catalog too; no cutting corners here!  I love how you can combine several different patterns of paper in a project and they work together so well!  These colors are just yummy!  Note the large label cut from the Designer Paper with the new Framelit Die from the Occasions Mini Catalog!  I love this shape and a big PLUS is the coordinating stamp set Apothecary Art (not shown).  Just beautiful!

The large butterfly is die cut with the Big Shot and the Beautiful Butterflies die (#114507) from the same DSP and has a small flower from the Fresh Vintage (SAB set) placed in its center and topped with a Basic  Pearl colored with Sharpie pens.
The "banner" is stamped with a trim or border stamp, again from the Fresh Vintage set, then topped with a sentiment from the Bring on the Cake set stamped and punched out with the Word Window Punch.  More tiny Basic Pearls adorn the banner.
Here's a little peek at the inside.  I stamped the border vertically on the inside edge of the card then added several small flowers punched out with the smallest flower on the BoHo Flower Punch to bring the colors to the inside.

I hope you've enjoyed this card today!  There are a multitude of terrific new products in the Occasions Mini and some great Sale-A-Bration bonus products!  Have you considered hostessing a workshop to earn some of these product for FREE?  You should, you really should!  : )

Thanks for visiting!  Hope to see you again soon,

Margaret

Friday, December 9, 2011

Merry & Bright, CCMC179 and SQSC16

For this Christmas card I combined the Create with Connie and Mary Color Challenge (CCMC179)  this week and the Stampin Queen's Sketch Challenge (SQSC 16) over at the Stampin' Queens blog.
Connie and Mary's Challenge of Poppy Parade, Lucky Limeade and Basic Grey was a challenge... that's not a normal color scheme I would have come up with for a Christmas card, lol, but I ended up happy with the result.  I added in some Whisper White which helps give contrast to the dark-ish grey and the bright poppy and limeade. 
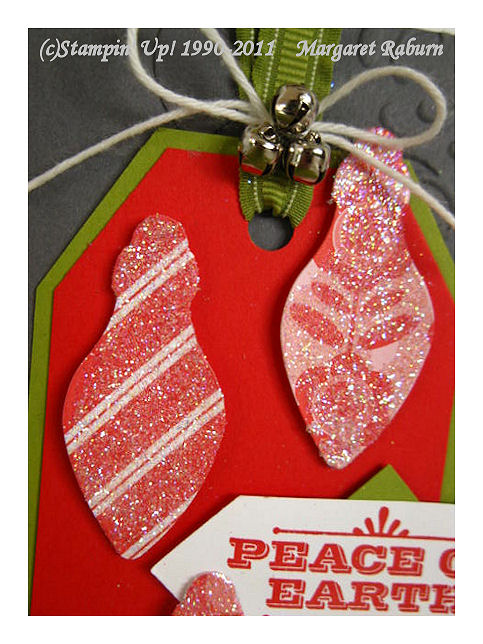
 The right side of the Basic Grey panel was textured with the Big Shot and the Finial Press Embossing Folder.  Barely visible in the pictures is a strip of Basic Grey cut with the Tasteful Trim Die which covers the seam between the plain and the embossed sections of the background.  The tag is Poppy Parade layered on Lucky Limeade.  At the top of the tag, a length of Lucky Limeade Ruffled Ribbon is tied with White Twine then three Mini Jingle Bells added with Mini Glue Dots.
I used the Stocking Accents Originals Die from the Holiday Mini to diecut the ornament shapes from Poppy Parade Designer Papers that were a Hostess Premium last year.  (Love that FREE stuff!)  I spread glue all over each one with my Two-Way Glue Pen then dipped them in the Dazzling Diamonds glitter!  They REALLY sparkle and shine!!  They were adhered with Dimensionals to give them height and prominence.  
The sentiment is from the Merry & Bright set.  It is stamped with Poppy Parade, cut down then a 7/8" square of Lucky Limeade was adhered behind the center.  This was attached to the card with Dimensionals.

I hope you enjoyed the card and will visit the two challenge sites and see what others did with this sketch and color combination!  Thanks for visiting me today!

Merry Christmas and happy stamping!

Margaret


Related Posts Plugin for WordPress, Blogger...